Follow Along...

Saturday, February 23, 2013

BON VOYAGE

Hey there, Taylored Expressions is hosting Day 9 of Love Fest through Splitcoaststampers!  Our challenge, "A Little Love Goes a Long Way", is to make a set of 3" x 3" or smaller cards.  I went with the super cute Bon Voyage set.  Love the boats and sentiments!  So fun!


COPIC COLORING: 
BOATS:  B99, B97, B95, B93, YR30, Y21, Y00, BG72, BG70  CLOUDS:  BG72, BG70

I hope you'll be able to play along...did I mention that Taylor will be giving away a $25 gift certificate to two lucky participants in their challenge?  All the more reason to play!  *grin*  You have until noon (CST) February 28, to upload your creation.  I can't wait to see what you come up with!


Thanks for stopping by


SUPPLIES: 
STAMPS:  TE Bon Voyage
PAPER:  Neenah Solar White; SU Baja Breeze; Teresa Collins Every Day Moments collection (Flying Bees, Blue Scroll)
INK:  Copic markers; Memento Tuxedo Black
ACCESSORIES:  Spellbinders Grand Calibur; TE Taylored Dies (Cloud Duo Die, Wave Border); paper snips; Exacto knife; 1 3/4" circle punch; Copic airbrush system; Zig 2-Way Glue pen; SU Dimensionals; adhesive
TECHNIQUE(S):  Airbrushing
SIZE OF FINISHED PROJECT:  3" x 3"

Tuesday, February 19, 2013

TAYLORED EXPRESSIONS FEBRUARY STUDIO CHALLENGE


Hey there, it's time for the Baker's Dozen Studio Challenge (a monthly opportunity for the DT to share what makes our stamping studios hum...each month we're asked a fun, crafty question so we can share our favorite products, tips/tricks, stamping advice and more).


The question for February is:
Recipe for success!  When you sit down to create a card just for fun, for the pure joy of stamping, without any type of assignment or deadline, what steps do you usually take?  Tell us how you get started and take us along on your creative journey.

You know, this is a great question...not so easy to answer...but still a great question!  I guess typically, I like to start with an idea.  Sometimes, if I'm lucky, the image of a finished card pops into my head and I get it on paper before I forget.  Those cards are always the easiest for me!  If I'm just in the mood for coloring, I'll choose a stamp set and the paper that I plan on using (so I have something to match my Copic colors to) then complete the card later.  If I'm working on a project start to finish, I usually choose my stamps, layout, paper then Copic colors.  See what I mean?  Not so easy to answer because there are so many different scenarios!

Take this card, for instance.  I just bought the super cute Hello Spring stamp set from Taylored Expressions.  I'm a sucker for super cute images that lets me do what I love...color!  So I've got my stamps and I have a layout in mind already...now for the paper.  I'm currently IN LOVE with the My Mind's Eye Collectable collection!  Right now, the question isn't what paper am I going to choose...it's how in the heck am I going to narrow it down!?!  Well that's not so tough once I start thinking about the colors in the stamp.  I know I want to find a paper that has orange (carrot), green (also the carrot) and yellow (chick).  Once I have the perfect paper, I can start my Copic selection.  To do that, I grab my handy dandy Copic Marker chart and put it next to the paper.  I usually try to find three or more colors that would blend well together, then on a piece of scrap Neenah, I'll try them out.  I'll hold my blended colors up to the pattern paper to see if it's a match.  If it is, I start coloring, but if it isn't, it's back to the drawing board until I can find something I like.


Here's the inside...isn't he a cute little bunny?  *grin*


COPIC COLORING: 
TRAIN CARS:  BG75, BG72, BG70, Y26, Y23, Y21, YR68, YR15, YR12  EASTER EGGS:  BG75, BG72, BG70, Y26, Y23, Y21, YR68, YR15, YR12  CHICK:  Y26, Y23, Y21, YR68, YR12  FLOWERS:  YR68, YR15, YR12, BG75, BG72, BG70, Y26, Y23, Y21, YG25, YG21  SHEEP:  W2, W0, C6, C4, C2, C0  GROUND:  E44, E43, E42, E40  SKY:  YR30, Y00, Y0000  INSIDE IMAGE:  YR68, YR15, YR12, YG25, YG21, YG0000, C6, C4, C2, C0, W2, W0, R30, R00, R0000, E44, E43, E42, E40

SUPPLIES: 
STAMPS:  TE Hello Spring
PAPER:  Neenah Solar White; Bazzill Raven Monochromatic; My Mind's Eye Collectable collection (Notable "Cute" Petite, Notable "Wonder" Dream, Memorable "Journey" Adventure, Notable "Wonder" Lovely)
INK:  Copic markers; Memento Tuxedo Black
ACCESSORIES:  Spellbinders Grand Calibur; TE Taylored Dies Banner Stacklets 1; Bazzill Blackbird rhinestones; SU Dimensionals; adhesive
SIZE OF FINISHED PROJECT:  A2 (4 1/4" x 5 1/2")

That's it for me today...stop by the other Baker's Dozen blogs for a glimpse into their creative processes.

Carole Burrage 
Charmaine Ikach 
Jami Sibley (DT Coordinator)
Jen Shults 
Kerri Michaud 
Lynnette Kauffman 
Sankari Wegman 
Shannon White  
Shelly Mercado 
Stephanie Kraft 
Tammie Edgerton (that's me)
Taylor VanBruggen 
Wanda Guess 


Thanks for stopping by! 


Saturday, February 16, 2013

SOULMATE

Hey there, happy Saturday!  I thought I would pop in and share a card I made with Taylored Expressions Animals in Love - Flamingos stamp set.  But first, I have to share something...yep, confession time!  *grin*

So a couple years ago I attended the first Copic Certification class and was able to play with the Copic airbrush system and didn't take to it immediately, but thought maybe it would grow on me.  Well, I decided to purchase it at my LSS and got a smokin' good deal on it...waaayyyy too good to pass up!  Anyway, I think I tried using it once with disastrous results so back in the box it went...tucked under my desk.  Out of sight out of mind!  I know *gasp*!  But then I attended CHA in January and saw Cindy Lawrence using one.  I pledged to dig mine back out of the box and give it a try again and well, I did it!  Woohoo!  I had mentioned to my hubby that I was going to try my hand at airbrushing and I really didn't think he was even paying attention.  As I was playing with it, in walks hubby.  I don't really know what he was expecting, but here's a snippet of our conversation:

Hubby:  Looks like clouds.
Me:  Um hmmm.
Hubby:  Is it supposed to?
Me:  Yep.
Hubby (noticing the shiny air compressor sitting on the floor):  Holy crap, how much did you pay for that?
Me:  Honestly, I couldn't tell you...I bought it a couple of years ago and have never really used it.
Hubby (still in shock at what he could only imagine I spent on it):  I'll have to take a good look at it...hey, you'll be able to paint my fishing lures with that thing!

Ugh...lucky me!  Ha!  I suppose it's a fair trade off though!  Anyway, this is the result of my first real attempt at airbrushing.  I'm a little heavy handed, but I think that will come with practice.  So, I started by using a cloud template and airbrushing the sky before coloring the flamingos with Copic markers.  I wasn't done with it yet...I airbrushed the Layering Doily Medium die and the background paper was actually black and white...but I fixed that!  Ha!  I airbrushed the paper to match then looked around to see what else I could try it on.  I thought, what the heck, why not try it on a white button.  It worked!  I think I'll go ahead and leave it out for a while and play with it a little bit more.  Stay tuned for more airbrushing...


COPIC COLORING: 
FLAMINGOS:  RV29, RV25, RV23, RV21  BEAKS:  RV21, RV0000, C4, C2  SKY:  RV21  HEART DOILY/BUTTON:  RV29, RV25

Thanks for stopping by! 


SUPPLIES: 
STAMPS:  TE Animals in Love - Flamingos
PAPER:  Neenah Solar White; Bazzill (Raven Monochromatic; Basics collection Picnic Plaid, Big Dot, Sonnet)
INK:  Copic markers; Memento Tuxedo Black
ACCESSORIES:  Spellbinders (Grand Calibur, Nestabilities Standard Circles Large); TE Taylored Dies (Layering Doily Medium, Banner Stacklets 1, Cloud Border); Copic airbrush system; American Crafts Elements Buttons; Creative Impressions Black Twine; SU Dimensionals; Mini Glue Dots; adhesive
TECHNIQUE(S):  Airbrushing; masking
SIZE OF FINISHED PROJECT:  5 1/4" x 5 1/4"

Friday, February 8, 2013

TAYLORED EXPRESSIONS FEBRUARY SPOTLIGHTS: CALLA LILY BOUQUET & SILHOUETTE STEMS 1

Hey there, today is Spotlight Day and I'm sharing my favorite card for the February Release.  All of the stamps and dies for this release are now available in the Fresh out of the Oven section of the Taylored Expressions store.  

I have two cards to share with you today.  The first is a Whimsical Wishes set that I fell in love with the second I saw it.  It's called Calla Lily  Bouquet and it's GORGEOUS!  Several years ago I planted THE most beautiful plum colored mini calla lilies in my yard.  Every year I love to watch them pop up!  A really good friend of mine had surgery a couple days ago to hopefully help with her chronic pain, so I made this for her.  She's really into flowers and gardening so this will be perfect!

The bouquet was stamped in Tuxedo Black, cut out with the out-of-the-box with a Nestie technique then colored with Copic markers.  The sentiment was stamped on a Designer Mini Tag and attached to hemp cord.


COPIC COLORING: 
CALLA LILY:  RV66, RV63, RV55  FLOWER CENTERS:  C3, C1, C00  STEMS:  G07, YG25, YG21  VASE/WATER:  BG72, BG70  SHADOW:  C3, C1, C00

Selected as SCS Favorites ~ Best of 2013!

SUPPLIES: 
STAMPS:  TE Calla Lily Bouquet
PAPER:  Neenah Solar White; Bazzill Raven Monochromatic
INK:  Copic markers; Memento Tuxedo Black
ACCESSORIES:  Spellbinders (Grand Calibur, Nestabilities Classic Squares Small, Classic Squares Large, Fleur De Lis Squares); Taylored Dies Designer Mini Tags; paper snips; Stamp-a-ma-jig; Black Hemptique Hemp Cord; Crafter's Pick The Ultimate glue; SU Dimensionals; adhesive
TECHNIQUE(S):  Out-of-the-box with a Nestie
SIZE OF FINISHED PROJECT:  5 1/4" x 5 1/4"


The last card features Silhouette Stems 1, Elegant Butterflies, Elegant Butterflies Overlays and a sentiment from the January Release.  I actually saw this technique on Pinterest and wanted to give it a try.  Silhouette Stems 1 was die cut out of the top panel and glued back into place popping up the flower heads on foam.  A sentiment from Bless Your Nest was stamped, the rhinestones were colored with a Copic marker then scattered around the card...the butterfly completes the card.  Hmmm...the pictures make it look like it's black and white only it isn't, it's purple and white.  Oh well!  And this completes my "white phase"...or will it?  Ha!


Here's a close up of the popped up flowers... 

SUPPLIES: 
STAMPS:  TE Bless Your Nest
PAPER:  Neenah Solar White; Bazzill Majestic Smoothies
INK:  Memento Grape Jelly
ACCESSORIES:  Spellbinders Grand Calibur; Taylored Dies (Silhouette Stems 1, Elegant Butterflies, Elegant Butterflies Overlays); KaiserCraft Silver rhinestones (colored with BV08); Stamp-a-ma-jig; Zig 2-Way Glue pen; SU Dimensionals; adhesive
SIZE OF FINISHED PROJECT:  A2 (4 1/4" x 5 1/2")

Alrighty then, that will do it for me.  Don't forget to visit the rest of the Baker's Dozen to see their spotlight projects.

Carole Burrage 
Charmaine Ikach 
Jami Sibley (DT Coordinator)
Jen Shults 
Kerri Michaud 
Lynnette Kauffman 
Sankari Wegman 
Shannon White 
Shelly Mercado 
Stephanie Kraft 
Tammie Edgerton (that's me)
Taylor VanBruggen 
Wanda Guess 
Anna Wight (Guest Designer)

Thanks for stopping by! 

Thursday, February 7, 2013

TAYLORED EXPRESSIONS FEBRUARY RELEASE DAY: SILHOUETTE STEMS 3

Hey there, it's Release Day!  Whoop whoop!  You know what that means...all of the awesome stamps and dies you've seen over the last couple of days are now available in the Fresh out of the Oven section of the Taylored Expressions store!  Before you head over to purchase your favorites, check out my project for today using the Silhouette Stems 3 die and Posh Posies stamp set.

I absolutely love the new Silhouette Stems dies...so many possibilities!  The flower was die cut into the top panel allowing the colored cardstock beneath to show through.  The sentiments in Posh Posies were stamped into the corners and coordinating May Arts ribbon was used to tie knots on each of the cards.  It seriously doesn't get any easier than this!  Oh...and did you notice?  More white for my "white phase"!  Ha!


Birthday...

Thank you...

Sympathy...love how simple they all were!


SUPPLIES: 
STAMPS:  TE Posh Posies
PAPER:  Neenah Solar White; Bazzill (Raven Monochromatic, Parakeet Monochromatic, Maraschino Monochromatic)
INK:  Memento Tuxedo Black
ACCESSORIES:  Spellbinders Grand Calibur; Taylored Dies (Silhouette Stems 3); Stamp-a-ma-jig; May Arts ribbon; SU Dimensionals; adhesive
SIZE OF FINISHED PROJECT:  A2 (4 1/4" x 5 1/2")

OK...that's it for me today.  Make sure you stop back by tomorrow to see my favorite project for the week.  Here's the links for the rest of the Baker's Dozen...enjoy the eye candy they have in store for you!


Carole Burrage 
Charmaine Ikach 
Jami Sibley (DT Coordinator)
Jen Shults 
Kerri Michaud 
Lynnette Kauffman 
Sankari Wegman 
Shannon White 
Shelly Mercado 
Stephanie Kraft 
Tammie Edgerton (that's me)
Taylor VanBruggen 
Wanda Guess 
Nancy McKinney (Illustrator)
Regina Mangum (Media and Promotions)


Thanks for stopping by! 


Wednesday, February 6, 2013

TAYLORED EXPRESSIONS FEBRUARY SNEAK PEEK: POSH POSIES

Hey there, what did you think of yesterday's peeks?  Pretty amazing, huh?  The Baker's Dozen gals are flippin' talented!  One more day before the February Release is available for purchase in the Fresh out of the Oven section of the Taylored Expressions store.

Today I'm sharing a project made with the new Embracing Grace Posh Posies set.  My manager at work is out due to a recent surgery, so I wanted to make her a get well card.  The Circles Cutting Plate makes for an awesome, no-fuss background and the Notepaper and Clipboard dies are a nice touch for an office manager, don't you think?  *grin*


Here's a close up...I'm still in my "white phase".  LOL!  I've been really into white with a pop of color lately.  The silver rhinestones were colored with an R27 Copic marker, the sentiment was stamped in Memento Lady Bug and the seam binding was was died to match.


SUPPLIES: 
STAMPS:  TE Posh Posies, Notepaper
PAPER:  Neenah Solar White; Bazzill (Raven Monochromatic, Metallic Silver)
INK:  Memento (Tuxedo Black, Lady Bug)
ACCESSORIES:  Spellbinders Grand Calibur; Taylored Dies (Circles Cutting Plate, Notepaper and Clipboard dies); Stamp-a-ma-jig; KaiserCraft Silver rhinestones (colored with R27); non-stick craft mat; mini mister (water); heat tool; SU Dimensionals; adhesive
SIZE OF FINISHED PROJECT:  A2 (4 1/4" x 5 1/2")

Time to check out the Baker's Dozen to see what they came up with...see you back here again tomorrow for Release Day!
Carole Burrage
Charmaine Ikach
Jen Shults
Kerri Michaud
Lynnette Kauffman
Sankari Wegman
Shannon White
Shelly Mercado
Stephanie Kraft
Tammie Edgerton (that's me)
Taylor VanBruggen
Wanda Guess

Thanks for stopping by! 

Tuesday, February 5, 2013

TAYLORED EXPRESSIONS FEBRUARY SNEAK PEEK: EASTER DOODLES & BASKET-FULL

Hey there, it's time for sneak peeks of February's Taylored Expressions release...are you ready to be amazed!?!  The Baker's Dozen has some jaw-dropping projects to share with you this week!  To kick things off, I have two projects this morning...

The first one uses an adorable Whimsical Wishes set called Easter Doodles.  It's so stinkin' cute!  I wanted to make my Father-in-law an "eggstra" special Easter treat this year, and this is what I came up with.  


Greetings from the Easter Bunny...PRICELESS!  *grin*  The bunny in the middle was fussy cut and popped up on foam for dimension.  A Bugabee Flower completes the card.


My local card/scrapbook store has these awesome AccuCut dies available for us to use, and I've had my eye on the carrot for quite a while.  I can't believe how perfect the Whimsy Alpa dies are on the name card...the cursive script is awesome!  I'm tickled to be able to give him a personalized treat box!


COPIC COLORING: 
BUNNIES:  C3, C1, C00  EARS/NOSES:  R30, R00  EGG:  YR12, YR00, YR0000, YG25, YG21, YG00

SUPPLIES: 
STAMPS:  TE Easter Doodles
PAPER:  Neenah Solar White; Bazzill (Raven Monochromatic, Parakeet Monochromatic); Doodlebug Design Inc Hello Spring collection (Easter Bunnies)
INK:  Memento Tuxedo Black
ACCESSORIES:  Spellbinders Grand Calibur; Taylored Dies (Whimsy Alpha; Bugabee Flowers); paper snips; Stamp-a-ma-jig; ScorPal; Crafter's Pick The Ultimate glue; Zig 2-Way Glue pen; PC mouse pad/stylus/tweasers (to shape the flowers); Bazzill Blackbird rhinestones; SU Dimensionals; adhesive
TECHNIQUE(S):  Fussy cutting
SIZE OF FINISHED PROJECT:  A2 (4 1/4" x 5 1/2")

The second project uses an Apple Doodle Ink set called Basket-Full.  It's a super fun set that takes you from Valentine's Day, to Spring and right into Easter...love it!  I decided to go with the spring flowers and I love the sentiment.  It reminds me of a poem my dad used to say to me:  Spring is Sprung, the grass is rize, I wonder where the birdies is.  Kind of corny, huh?  Ha!

Anyway, the basket was stamped on Neenah, masked with a sticky note, stamped with the flowers then colored with Copic markers.  Love the Taylored Dies Cloud Duo and Grass Border dies...they really bring this little scene to life!  I've been into white space on cards lately, so I stuck with it and left mostly white for an easy-peasy layout.


Here's the inside... 


COPIC COLORING: 
BASKET:  RV66, RV63, RV55  BOW:  Y38, Y15, Y11  FLOWERS:  YR15, YR12, BG15, BG10, BV04, BV02, Y38, Y15, Y11  LEAVES:  YG25, YG21

SUPPLIES: 
STAMPS:  TE Basket-Full
PAPER:  Neenah Solar White; Bazzill Parakeet Monochromatic; Doodlebug Design Inc Hello Spring collection (May Flowers)
INK:  Memento Tuxedo Black
ACCESSORIES:  Spellbinders (Grand Calibur; Nestabilities Standard Circles Small, Standard Circles Large); Taylored Dies (Cloud Duo Die, Grass Border Die); Stamp-a-ma-jig; Zig 2-Way Glue pen; sticky note mask; SU Dimensionals; adhesive
TECHNIQUE(S):  Masking
SIZE OF FINISHED PROJECT:  A2 (4 1/4" x 5 1/2")


Don't forget to hop on by to the Baker's Dozen blogs to see what they have been up to and I'll see you back here tomorrow for more fun!
Carole Burrage 
Charmaine Ikach 
Jen Shults 
Kerri Michaud 
Lynnette Kauffman 
Sankari Wegman 
Shannon White 
Shelly Mercado 
Stephanie Kraft 
Tammie Edgerton (that's me)
Taylor VanBruggen 
Wanda Guess 
Anna Wight (Guest Designer)
Nancy McKinney (Illustrator)

Thanks for stopping by! 


Monday, February 4, 2013

HIVE YA BEEN?

Hey there, I really wanted to play along in my friend, Brenda's (aka tessaduck),  Sweet Hexagons VSN challenge through Splitcoaststampers.  I pulled out Beebug from Whipper Snapper Designs and colored it up really quick.  I bought the MFT Hexagons die forever ago, but have never had the opportunity to use it.  Thanks, Brenda...I love using new (old) stash!  The bee's wings have Stickles on them while his nose, antennae and the ladybug's shell all have clear glaze pen.


COPIC COLORING: 
BEE:  Y19, Y15, Y13, Y11, Y00  BEE'S NOSE/STRIPE/LEGS:  C6, C4, C2, C0  BEE'S WINGS:  BG72, BG70  LADYBUG:  R27, R24, R22, R20, C6, C4, C2, C0  FLOWER:  R27, R24, R22, R20, Y19, Y15, Y00  GROUND:  YG25, YG21  HEXAGONS:  Y19, Y15, Y13, Y11, Y00  DIE CUT FLOWER:  R27, R24, R22, R20

Thanks for stopping by! 


SUPPLIES: 
STAMPS:  WSD Beebug
PAPER:  Neenah Solar White; Bazzill (Raven Monochromatic, yellow *not sure of the name*); Bella Blve Sunshine Happiness collection (Petal Power)
INK:  Copic markers; Memento Tuxedo Black
ACCESSORIES:  Spellbinders Grand Calibur; MFT Die-namics (Hexagons, Flower Trio & Leaf Trio); PC mouse pad/stylus (to shape the flower); button brad from my stash; Sakura Clear Glaze pen; Star Dust Stickles; Mini Glue Dots; Zig 2-Way Glue pen; adhesive
SIZE OF FINISHED PROJECT:  A2 (4 1/4" x 5 1/2")

Friday, February 1, 2013

STAY COOL...

Hey there, I'm back with another VSN challenge through Splitcoaststampers.  Theresa's (aka theelopers) Birds of a Feather challenge was a lot of fun!  She wanted us to "flock" together two birds, three different embellishments and four colors from the inspiration photo.  I was digging through my stash of Whipper Snapper Designs stamps and came across this one called Summer Bath Time..two birds *check*, three different embellishments *check* (die cut flower, hemp cord, button)...four inspirational colors *check* (red, blue, yellow, green).  Easy peasy!


COPIC COLORING: 
CHICKS:  Y19, Y15, Y11, Y00, YR15, YR12, YR00  UMBRELLA:  B26, B24, B21, R27, R24, R22  WATER DROPS:  B24  BIRD BATH:  BG05, BG72, BG70  FLOWERS:  R24, R22, Y15, Y11, YG93, G20

Thanks for stopping by! 


SUPPLIES: 
STAMPS:  WSD Summer Bath Time
PAPER:  Neenah Solar White; Bazzill Raven Monochromatic; SU Summer Sun; Little Yellow Bicycle Sweet Summer Time collection (Summer Garden, Lime Stripe)
INK:  Memento (Tuxedo Black, Summer Sun)
ACCESSORIES:  Spellbinders Grand Calibur; Taylored Dies (Grass Border, Cloud Border die); MFT Dienamics Plentiful Petals; Sizzix embossing folder; sponge; paper snips; Sakura Clear Glaze pen; button from my stash; Hemptique Black Hemp Cord; PC mouse pad/stylus (to shape flower); Crafter's Pick The Ultimate glue; Zig 2-Way Glue pen; adhesive
TECHNIQUE(S):  Sponging, fussy cutting
SIZE OF FINISHED PROJECT:  A2 (4 1/4" x 5 1/2")

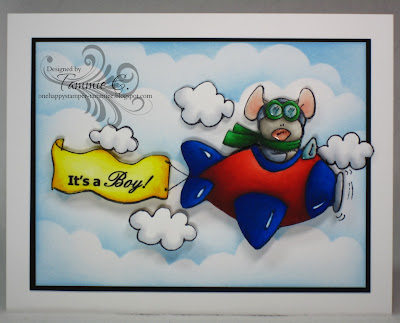
IT'S A BOY!

Hey there, well it's that time again...Virtual Stamp Night (VSN) through Splitcoaststampers (SCS)!  This VSN is all about the Birds, Bees and Creepy Crawlies!  No creepy crawlies for Misti's challenge though...she's all about mixing the birds and the bees with the outcome of the stork delivering a little bundle of joy!  She wants us to make a baby card of any kind.

My mind instantly went to Whipper Snapper Designs and all the cute baby stamps, but then I thought of this one...Pilot Bradly...and thought, what the heck!  I decided to go with primary colors and the rest is history!


This little guy was stamped several times and cut out in different stages for added dimension...sure wish you guys could see this up close and personal! 


COPIC COLORING: 
PLANE:  E09, R27, R24, R22, R21, B29, B28, B26, B24  WINDSHIELD:  BG72, BG70  PROPELLER:  C3, C1, C00  MOUSE:  W3, W1, W00  NOSE:  R30, R00, R0000  EARS:  R30, R00, R0000, W00  LEATHER JACKET/HELMET:  C6, C4, C2, C00  GOGGLES:  G28, G05, G02, BG72, BG70  SCARF:  G28, G05, G02  BANNER:  Y19, Y06, Y00  CLOUDS:  C2, C0, 0

Thanks for stopping by! 


SUPPLIES: 
STAMPS:  WSD Pilot Bradly
PAPER:  Neenah Solar White; Bazzill Raven Monochromatic
INK:  Copic markers; Memento (Tuxedo Black, Summer Sky)
ACCESSORIES:  Taylored Dies Cloud Border; sponge; paper snips; Sakura Clear Glaze pen; Zig 2-Way Glue pen; SU Dimensionals; adhesive
TECHNIQUE(S):  Fussy cutting; sponging
SIZE OF FINISHED PROJECT:  A2 (4 1/4" x 5 1/2")
Related Posts Plugin for WordPress, Blogger...