OMGosh...today is the last day of March. Seriously, where did the time go??? I thought I would pop in this morning and share a card I made using two Our Craft Lounge sets: Fabulous Florals and Say it With Flowers. They coordinate perfectly with each other! This is the first card that I've made in a long time that is strictly ink. I kinda like it...but I do love to color! I have some pretty cool ideas for upcoming projects floating around in my head...now to find the time to sit down and work them out.

 SUPPLIES
STAMPS: OCL's Fabulous Florals, Say it With Flowers
PAPER: Neenah Solar White; SU Cajun Craze, Certainly Celery, Early Espresso
INK: SU Whisper White Craft Ink
ACCESSORIES: Rhinestone; Foam Square
SIZE OF FINISHED PROJECT: A2 (4 1/4" X 5 1/2")
SUPPLIES
STAMPS: OCL's Fabulous Florals, Say it With Flowers
PAPER: Neenah Solar White; SU Cajun Craze, Certainly Celery, Early Espresso
INK: SU Whisper White Craft Ink
ACCESSORIES: Rhinestone; Foam Square
SIZE OF FINISHED PROJECT: A2 (4 1/4" X 5 1/2")
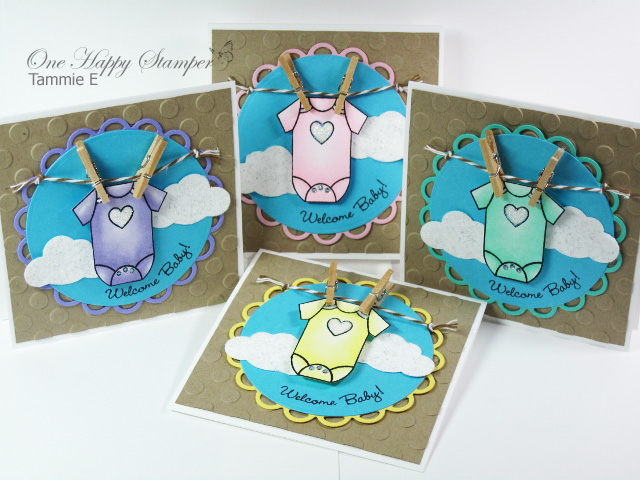
I'm back with the other project I was telling you about earlier. My local scrap booking store, Memories of Time, is hosting a CHA Make-n-take Day on April 16th. If you are a VIP, make-n-takes are free...if you aren't, they are only $1. How fun is that!?! Michelle asked me to come up with a quick project that uses supplies purchased at CHA. The stamp set I chose was from the Our Craft Lounge CHA release called Bundle of Joy (love that set!) and the other product is called Best Glue Ever from ScrapPerfect. You may not know it, but I am all about choices so I couldn't just make one sample...no siree, Bob...I had to make four! Actually, there were going to be five, but the blue onesie with the blue sky just wasn't working for me. My friend, Dianna, made this card a while ago and posted it in her gallery. I've wanted to make one ever since. Thanks for the inspiration, D!

 SUPPLIES
STAMPS: OCL's Bundle of Joy
PAPER: Neenah Solar White; assorted card stock from Bazzill
INK: Memento Tuxedo Black
ACCESSORIES: Copic markers; Big Shot; Spellbinders Nestabilities Standard Circles Small, Lacey Circles; Sizzix embossing folder; Sugar Crafty Sparkles; Fiskars Cloud punch; Sugar Sparkly Fluff; 2-way Glue Pen; Best Glue Ever; Cappuccino twine from The Twinery; Loew Cornell Tiny Spring Clothespins; paper snips; Pop Dot
SIZE OF FINISHED PROJECT: 4" x 4"
SUPPLIES
STAMPS: OCL's Bundle of Joy
PAPER: Neenah Solar White; assorted card stock from Bazzill
INK: Memento Tuxedo Black
ACCESSORIES: Copic markers; Big Shot; Spellbinders Nestabilities Standard Circles Small, Lacey Circles; Sizzix embossing folder; Sugar Crafty Sparkles; Fiskars Cloud punch; Sugar Sparkly Fluff; 2-way Glue Pen; Best Glue Ever; Cappuccino twine from The Twinery; Loew Cornell Tiny Spring Clothespins; paper snips; Pop Dot
SIZE OF FINISHED PROJECT: 4" x 4"
Hi there stampers! Long time between posts...I'm finding it difficult to juggle work, family, exercise (now that the weather is getting better), sleep, classes and my blog. I'm sure it will all work out, but what does everyone else do to find balance? I wanted to do a quick post this morning to share a card I made over the weekend using an Our Craft Lounge set called Nature's Note. I seriously LOVE this butterfly!
To make this project, I stamped the first and third butterflies with Memento ink on Neenah card stock. They were masked with sticky notes then the second and fourth butterflies were stamped. One additional butterfly was stamped on a scrap and cut out. All of the butterflies were colored with Copic markers and one was popped up.
To make the background panel, I used a Stampendous Marble Cube. I've had it for a long time but have never inked it up. It's really easy to use...it has three rubber sides (A, B and C) and you stamp in that order from lightest to darkest ink. Easy peasy! I have one more project to share, but I'm afraid that will have to wait...I'm off to work now. Got to go support my habit, huh?  Copic coloring:
Butterflies: B02, B01, B00, YG41, G12 Outline: 110
Thanks for stopping by!
Copic coloring:
Butterflies: B02, B01, B00, YG41, G12 Outline: 110
Thanks for stopping by!  SUPPLIES
STAMPS: OCL's Nature's Note; Stampendous Marble Cube
PAPER: Neenah Solar White; SU Sage Shadow
INK: Memento Tuxedo Black; SU Baja Breeze, Sage Shadow, Tempting Turquoise
ACCESSORIES: Copic markers; Big Shot; Spellbinders Nestabilities Labels 8; Punch Bunch tool kit; Glue Dot; adhesive
SIZE OF FINISHED PROJECT: A2 (4 1/4" x 5 1/2")
SUPPLIES
STAMPS: OCL's Nature's Note; Stampendous Marble Cube
PAPER: Neenah Solar White; SU Sage Shadow
INK: Memento Tuxedo Black; SU Baja Breeze, Sage Shadow, Tempting Turquoise
ACCESSORIES: Copic markers; Big Shot; Spellbinders Nestabilities Labels 8; Punch Bunch tool kit; Glue Dot; adhesive
SIZE OF FINISHED PROJECT: A2 (4 1/4" x 5 1/2")
I'm on a roll! A project yesterday...one today...heck, I'll have to see about posting another one tomorrow just because! LOL! It's a stormy day here on the Oregon Coast so I might as well be inside creating stuff, right? The challenge over at The Lounge this week is to use bling so I'm back with another blinged out project. Did you know you could win an Our Craft Lounge stamp set of your choice if you play along in the challenges? Click on the word "challenge" above for all of the details. I also decided to use the Mojo Monday sketch...only I had to switch sides with it. I used the GORGEOUS new Bo Bunny designer paper and wasn't really thinking it out too clearly when I cut the paper. If I would have used the sketch as it was, the words on the DP would have been sideways. I couldn't have that, now could I? So I switched it and all is right again. Whew!

I've had this thing for punched flowers lately. They are so cool, but a little time consuming to make. I'm not sure if it's because I'm still learning. Maybe it will go quicker as I get a little more comfortable making them. Who knows! I showed Cami, from Our Craft Lounge, this project yesterday and she told me she hated me. LOL! She's never been interested in punched flowers like this before...but she might have to make a few now. Teeheehee!
After this project was completed, I decided it would make a very nice Mother's Day gift...just ditch the jelly beans and use chocolate or whatever candy mom likes.
Michelle recently got in a bunch of these test tubes at Memories of Time (MOT). I couldn't wait to make a project with one, but I knew it would need a box to keep it stable. I got out my ruler and started figuring out what size it needed to be (I already had a general idea for the shape). A bunch of little pieces were cut and taped together and eventually, I made a template! Woot!
A cover was made for the cap then the full-sized rose was glued on top. To make the rose, I followed the directions in The Paper Garden, by Susan Tierney Cockburn. I punched about 25 medium Punch Bunch pears then lightly sponged the edges before setting to work shaping and gluing the petals. I love the results! It's a very realistic looking rose!
The rosebuds were made the same way with 5-6 pear punches each.
Daisies accompany the roses. I didn't have the same punch Susan suggested for the centers so I improvised and use the mini sun instead. Two different sized daisy punches were used and each daisy was punched twice; the small daisy only has one sun for the center where the larger daisies have two.
Copic coloring:
Butterfly: RV14, RV13, RV11 Outline: 110
The current challenge over at The Lounge is to use bling. I opted to use rhinestones on the butterfly's bodies and a few on the designer paper.
This project includes the following challenges:
The Lounge ~ Use Bling
Delightful Challenges ~ Butterflies
Flutterby Wednesday ~ Photo Inspiration
My Time To Craft Challenge ~ Jewels
Paper Crafting Journey ~ Things With Wings
Sarah Hurley Challenge Blog ~ Flowers
Southern Girls Challenge ~ Flowers
Stampin' B's Design Team ~ Use Bling
Stampin' For The Weekend ~ Springtime
The Three Muses Challenge ~ Spring
Thanks for stopping by! SUPPLIES
STAMPS: OCL's Nature's Notes
PAPER: Bazzill ; SU Garden Green; Imaginisce Flower Power DP
INK: Memento Tuxedo Black; SU Rose Red
ACCESSORIES: Copic markers; paper snips; Kaiserkraft Basics rhinestones; The Paper Garden; Punch Bunch Small Circle, Medium Pear, Medium Birch Leaf, Small and Medium Daisy, Mini sun, 3D Punch Craft Tool Kit, Magnum Power Punch;
SIZE OF FINISHED PROJECT: 2" square x 8ish" tall (including flower)
SUPPLIES
STAMPS: OCL's Nature's Notes
PAPER: Bazzill ; SU Garden Green; Imaginisce Flower Power DP
INK: Memento Tuxedo Black; SU Rose Red
ACCESSORIES: Copic markers; paper snips; Kaiserkraft Basics rhinestones; The Paper Garden; Punch Bunch Small Circle, Medium Pear, Medium Birch Leaf, Small and Medium Daisy, Mini sun, 3D Punch Craft Tool Kit, Magnum Power Punch;
SIZE OF FINISHED PROJECT: 2" square x 8ish" tall (including flower)