Follow Along...

Showing posts with label CC DESIGNS. Show all posts

Monday, October 10, 2016

DID I SCARE YOU BANNER

Hey there, sadly, this will be my last Copic class at Memories of Time in Coos Bay.  The store is closing.  *sniff*  In case anyone is interested, I'm considering having classes in my new crafty space once we move and get settled...we are buying another house and expect (fingers crossed) to close October 26th!  I'm trying to be patient, but it's super hard!  *wink*

Now onto my project...I wanted to create a Halloween banner using some C.C. Designs images and dies.  I love, Love, LOVE how it turned out!  Pictures just don't do this one justice!  The super cute trick-or-treaters were stamped with Tuxedo Black onto Neenah Solar White, die cut then colored with Copic markers.  Oh, how I've missed coloring!  CCD's banner dies and jumbo alphabets are absolutely perfect for a project like this!  Now that I've got this one done, I want to make more!  LOL


This first panel uses an Impression Obsession haunted house border die that I thought would be perfect teamed up with the witch.  It was cut twice...first in black glitter card stock then in Neenah.  The glitter card stock was getting lost in the starry night sky, so I decided to offset it with white creating a shadow.  It worked!

Here's a close up.


The second panel is super simple.  Taylored Expressions spiders and spiderweb along with the first letter is really all it needed.  I could have colored more of the CCD kids, but I didn't want it to be too busy.
Moving on, I think this is my favorite panel!  That little guy belly laughing is seriously the cutest!  Keeping with the "shadow effect", I went ahead and cut all of the letters twice as well.


Another close up.
Next up, one more basic panel.  Again, another Taylored Expressions spider web.  Taylor's ghosts were the perfect size and they look awesome peeking around the last of the letters.


Last up we have our little batty friend.  Another Impression Obsession die gives the perfect backdrop to this little one running from the haunted graveyard.  OMGosh, too cute!

Last close up.

COPIC COLORING:
SKIN:  E11, E00, E0000, R30  HAIR:  Y17, Y15, Y11, Y00  WITCH, SKELETON, BAT COSTUMES:  C6, C4, C2, C0, YG63, YG03, YG0000  WITCH'S BROOM:  C6, C4, C2, C0, Y17, Y15, Y11, Y00  SPEECH BUBBLE:  YG63, YG03, YG0000

Thanks for stopping by...I'll be back in a couple days to share another Wonderful Wednesday Stamping Bella project!


SUPPLIES:
STAMPS:  C.C. Designs (Roberto's Rascals Creepy Crawlies, Monster Mash)
PAPER:  Neenah (Solar White, Eclipse Black); Bazzill; Doodlebug Designs October 31st; Best Creation Inc Black Glitter card stock; Silhouette thin chipboard
INK: Copic markers; Memento Tuxedo Black 
ACCESSORIES:  Sizzix Big Shot; C.C. Designs Cutters (Creepy Crawlie Outlines, Monster Mash Outlines, Jumbo Alphabet, Make a Banner #15); IO (Die029-P, Die332-ZZ); TE Taylored dies (Spiders & Spiderweb, Haunted Accessories); MFT Die-namics Birthday Speech Bubbles; Crop-o-dile; Black Sharpie; Art Glitter Glue with precision tip; ribbon from my stash; Scrapbook Adhesives by 3L Thin Foam Squares; SU Dimensionals; adhesive
SIZE OF FINISHED PROJECT:  *

Sunday, March 6, 2016

CAS367 - HOPPY BIRTHDAY

Hey there, just popping in with a project for Julie's CAS challenge, Outside the Box, to have an element extend off the card base.  I decided to extend a small twine bow.  


This adorable little bunny was stamped with Tuxedo Black onto Neenah Solar White, colored with Copic markers, fussy cut then popped up on foam.  Her eyes have clear glaze for a subtle shine.  The die cuts are from My Favorite Things and the little bow completes the card.


COPIC COLORING:
SKIN:  E11, E00, E0000, R30  HAIR:  E35, E33, E30  MOUTH:  R30, E0000  TONGUE:  R30  BUNNY SUIT:  R85, R83, R81, C0  SHOES: C0

Thanks for stopping by...head to the CAS Forum to play along!


SUPPLIES:
STAMPS:  C.C. Designs (Bunny Twila, Hopped Up)
PAPER:  Neenah Solar White; Echo Park Easter
INK:  Copic markers; Memento Tuxedo Black
ACCESSORIES:  Sizzix Big Shot; MFT Die-Namics (Stitched Scallop Edges, Jumbo Peek-a-boo Circle Window); scissors; X-Acto Knife; glass cutting plate; Stamp-a-ma-jig; The Twine Strawberry; small flower punch; KaiserCraft rhinestone; Sakura Clear Glaze pen; SU Dimensionals; Art Glitter glue; adhesive
TECHNIQUE(S):  Fussy cutting
SIZE OF FINISHED PROJECT:  A2 (4 1/4" x 5 1/2")

Monday, February 8, 2016

CAS363 - FRECKLES

Hey there, I finally got the pictures for my last card for the SCS CAS challenge, Won't You Call Me Sweetheart.  This challenge is all about the sweethearts in our lives...create a Valentine and include a heart then head to the CAS Forum to play along!


This little cutie pie was stamped with Tuxedo Black onto Neenah Solar White, colored with Copic markers then fussy cut and popped up on foam.  Super easy peasy background makes for a quick Valentine!

COPIC COLORING:
SKIN:  E11, E00, E0000, R30  HAIR:  E25, E23, E21  HAIR BOWS, SHIRT, SOCKS:  R37, R35, R32  SKIRT:  R37, R35, R32, R85, R83, R81  SHOES:  T2, T0, R83  LOVE BANNER:  BG72, BG70

Thanks for stopping by!


SUPPLIES:
STAMPS:  C.C. Designs Freckles
PAPER:  Neenah Solar White; Bazzill; Doodlebug Design Inc Sweet Things
INK:  Copic markers; Memento Tuxedo Black
ACCESSORIES:  Scissors; glass cutting plate; X-Acto Knife; Zig 2-Way Glue pen; Scrapbook Adhesives by 3L Thin Foam Squares; adhesive
TECHNIQUE(S):  Fussy cutting
SIZE OF FINISHED PROJECT:  A2 (4 1/4" x 5 1/2")

Sunday, December 6, 2015

CAS354 - SNOW FUN

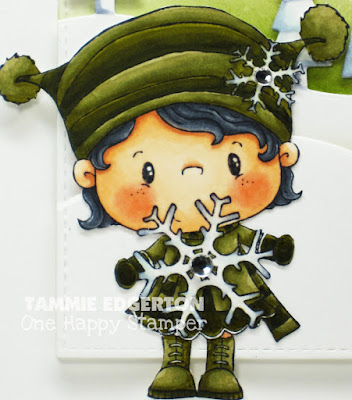
Hey there, back with card number two for the Evergreen CAS challenge at SCS...this was the layout I was telling you about.  I created it by spritzing the panel with masking fluid, letting it dry then sponging Pistachio and Bamboo Leaves over the top.  The snow-filled sky pops after the mask is gently rubbed off.


The adorable Snowflake image is from C.C. Designs.  Don't you love her rosy cheeks?  She was stamped with Tuxedo Black onto Neenah Solar White, colored with Copic markers then fussy cut.  The snowflakes have Clear Wink of Stella and a silver rhinestone in the center.  The layers were all popped up on foam.


COPIC COLORING:
SKIN:  E11, E00, E0000, R30  HAIR:  C7, C5, C3, C1  CLOTHES, SHOES, HAT:  YG99, YG97, YG95, YG93, YG91  SNOWFLAKES, TREE LINE:  BV20, BG70

Thanks for stopping by...break out those greens and join us at the SCS CAS forum!


SUPPLIES:
STAMPS:  C. C. Designs Snowflake
PAPER:  Neenah Solar White
INK:  Copic markers; Memento (Tuxedo Black, Pistachio, Bamboo Leaves)
ACCESSORIES:  Sizzix Big Shot; MFT Die-Namics (Stitched Rectangle Stax, Snowdrift, Tree Lines); IO Die100-F; X-Acto Knife; glass cutting plate; scissors; Windsor & Newton Colorless Art Masking Fluid; toothbrush; Ranger Mini Blending Tool; sponges; Clear Wink of Stella pen; KaiserCraft Silver Rhinestones; Scrapbook Adhesives by 3L Thin Foam Squares; Art Glitter glue; adhesive
TECHNIQUE(S):  Masking, sponging, fussy cutting
SIZE OF FINISHED PROJECT:  A2 (4 1/4" x 5 1/2")

CAS354 - JOLLY HOLLY-DAYS

Hey there, I've got two cards to share with you today.  They are both for this week's Evergreen, monochromatic greens, CAS challenge over at Splitcoaststampers.  I actually made a different background for this cutie pie, but it was too much white and I just wasn't feeling it.


Frosty is from C.C. Designs and is so much fun to color!  He was stamped with Tuxedo Black onto Neenah Solar White, colored with Copic markers then fussy cut.  In keeping with the "green" theme, the snowman suit was colored with my favorite snow combo...green...blue green to be more precise.  Mask It was used to cover the bottom portion of the panel then a liquid masking fluid was spritzed with a toothbrush.  After it was dry, Pistachio was sponged over the top then I used my finger to rub off the masking fluid after it was done.  I actually got this idea for the layout from a card that Kim O'Connell recently made.  Love it!  I left off the sequins and added a die cut element in the corner.  Well, I guess that's about it.


COPIC COLORING:
SKIN:  E11, E00, E0000, R30  HAIR:  C7, C5, C3, C1  HAT:  C7, C5, C3, C1, YG95, YG93, YG91  SCARF, HOLLY:  YG95, YG93, YG91  CARROT NOSE:  YR18, YR15, YR12  BUTTONS:  C7, C5, C3, C1  SNOWMAN SUIT:  BV20, BG70

Thanks for stopping by...head to the CAS forum to play along!

SUPPLIES:
STAMPS:  C. C. Designs Frosty, Jolly Christmas
PAPER:  Neenah Solar White;  Bazzill
INK:  Copic markers; Memento (Tuxedo Black, Pistachio)
ACCESSORIES:  Sizzix Big Shot; MFT Die-Namics Blueprints 21; PS Holly die; X-Acto Knife; glass cutting plate; scissors; Clear Wink of Stella pen; Windsor & Newton Colorless Art Masking Fluid; toothbrush; Mask It; Ranger Mini Blending Tool; sponge; MISTI; Art Glitter glue; Glossy Accents; Scrapbook Adhesives by 3L Thin Foam Squares; adhesive
TECHNIQUE(S):  Fussy cutting; masking; sponging
SIZE OF FINISHED PROJECT:  A2 (4 1/4" x 5 1/2")

Sunday, July 1, 2012

GOUDA

Hey there, I found this Whipper Snapper Designs image among a bunch of others that I've had colored for months.  Sweet Sunday Sketch has a cool challenge, so I thought I would play along.  The WSD stamp is called Gouda, and I seriously love their stamps!  The mouse's nose, jingle bell, candy cane and berries from the mistletoe all have clear glaze pen on it for a subtle shine.  It seems like I've been using my clear glaze pen on every project lately...I can't get enough of it!  Ha!  And check out that Sparklet from KaiserCraft...it's awesome and makes for a perfect poinsettia center!


Here's the inside...


COPIC COLORING: 
NOSE:  R30, R000, R0000  MOUSE:  W3, W1, W00, R30, C3, C1, C00  SCARF:  B97, B95, B93, B91  MITTENS/HAT:  B97, B95, B93, B91, G24, G21, G20  JINGLE BELL:  G99, G94, G82  CANDY CANE:  R08, R05, R02, C3, C1  BOW:  YG09, YG07, YG06, YG05, YG03  GROUND:  C3, C1  FOLIAGE:  R08, R05, R02, G99, G94, G82, G24, G21, G20, W3


THIS PROJECT INCLUDES THE FOLLOWING CHALLENGES:
52 {CHRISTMAS} CARD THROWDOWN ~ Anything Goes
CHRISTMAS CARDS ALL YEAR 'ROUND ~ Christmas Flowers/Holly
CRAFTY CARDMAKERS ~ Create Your Own Flowers
SWEET SUNDAY SKETCH CHALLENGE ~ #162 Sketch


Thanks for stopping by! SmileyCentral.com 


SUPPLIES:
STAMPS:  WSD Gouda
PAPER:  Neenah Solar White; Bazzill Orange Peel (not exactly sure what shade); SU Certainly Celery; Basic Grey Nordic Holiday collection:  Lift Ticket
INK:  Memento Tuxedo Black
ACCESSORIES:  Copic markers; Spellbinders Grand Calibur, Nestabilities Standard Circles Small and Large, Big Scalloped Circles Small; Die-namics Icicle Border; Magnolia Doohickeys Poinsettia, Snowflake & Mistletoe, Hellebores; Punch Bunch tool kit (hobby blade and stylus); computer mouse pad; Sakura Clear Glaze pen; Star Dust Stickles; KaiserCraft Fern Sparklets; Bazzill green collection brads; Martha Stewart branch punch;  Zig 2-Way Glue pen; SU Dimensional; Best Glue Ever; adhesive
TECHNIQUE(S):  Out-of-the-box with a Nestie
SIZE OF FINISHED PROJECT:  A2 (4 1/4" x 5 1/2")

Sunday, January 2, 2011

FOOTPRINTS ON OUR HEARTS

Happy New Year, everyone!  I'm excited to get back to stamping after the holidays, unfortunately, my first card of the year is a sympathy card.  My friend's dad recently passed away and I wanted to let him know that I'm thinking of him and his family.  I used a beautifully written quote that I found online from Flavia Weedn.  In yesterday's post, I shared that my dad passed away in 2010, and I miss him dearly...has anyone left any footprints on your heart?
 
To start, a computer generated quote was printed on Neenah Solar White card stock and set aside.  Next, a butterfly from the CC Designs Butterfly set was stamped with Memento Tuxedo Black on a scrap of Neenah then colored with Copic markers.  After it was colored, paper snips were used to cut it out.  When it comes to cutting abilities, my skill level is right there with a kindergartner (no offense to kindergartners!).  I'm sure everyone already knows...after you cut out your image, take a black marker and quickly go over the cut edge.  It will give it a nice, crisp finish to your cut image and won't draw attention to your cutting skills (hmmm...maybe I should just speak for myself?  Ha!).

The butterfly was set aside and the background layers were sponged.  All three layers use the same colors in the same order starting in the center and working towards the outside edge:  Barely Banana, So Saffron, Crushed Curry and Pumpkin Pie (to tone down the yellows).  Next the branch stamp in the Hang in There set from Gina K Designs was used to stamp the leaves on two of the panels.  They were stamped with Pumpkin Pie multiple times for added depth.  The Basic Black and sponged layers were adhered to the card front, a scrap of black ribbon was tied in a knot and the main panel and butterfly were popped up on Dimensionals.

Copic coloring:

Butterfly:  Y19, Y17, Y15, YR16, YR14  Outline:  110  Shadow (inside of card):  C3, C2, C1, C0

I've gotten really lazy about completing the inside of the card unless I'm giving it away.  I did an inside to this one though.  The butterfly is from the same CC Designs set and stamped then colored the same way as the card front.  The Thinking of You sentiment is also from the Butterfly set.

This card includes the following challenges:

Anything Goes Challenge Blog ~ The Letter C (C is for cherished memories)
Crafts and Me Challenges ~ Anything Goes
Creative Craft Challenges ~ Anything Goes
Frosted Designs ~ Use a Quote
Just Us Girls Challenge ~ Sketch
Little Red Wagon ~ Leftovers (I used a scrap of ribbon from my stash)
Mark's Finest Papers ~ Use Something New (I used my new photo printer for the quote)
Top Tip Tuesday ~ Get Embellishing (I used ribbon)

Thanks for stopping by!


SUPPLIES
STAMPS:  CC Designs Butterfly; Gina K Designs Hang in There
PAPER:  Neenah Solar White; SU Basic Black
INK:  Memento Tuxedo Black; SU Barely Banana, So Saffron, Crushed Curry, Pumpkin Pie
ACCESSORIES:  Copic markers; PC/printer; sponges; paper snips; ribbon from my stash; Dimensionals

Wednesday, October 13, 2010

WISH

SmileyCentral.comSo we have another birthday today...my friend from work is turning 30!  Happy bday, Tina!!!  I broke out my Bloomin' Beautiful set to make her a card.  I haven't inked it up in a long time and I've always only watercolored it.  This time I used my Copic markers and I really like how it turned out!

It was actually pretty easy to create.  The hardest part was placement of the butterflies.  Once I got them where I wanted, I masked them so I could stamp the poppy from Bloomin' Beautiful.

I colored everything with Copics not forgetting the shadow under my resting butterfly.  I used the out-of-the-box technique when I cut the image down to size.  I used two pieces of Old Olive (one of my fav SU colors!), ran them through my Big Shot with a leafy embossing folder then sponged some Old Olive around the edges (it's very subtle...if I were to do it again, I think I might go with Always Artichoke so it would stand out a little).


I layered everything with black card stock and started assembling it on my Cajun Craze panel.  Before adhering the small Old Olive piece, I used my mat pack and paper piercer and made three holes for the brads.  I used two sizes of tag punches and the word "wish" from the Small Script set.

The bow is from one of the jumbo wired ribbons I bought at Costco (it's 1.5 inches wide and has 50 yards on it).  I think I'm set for life with this stuff.  Ha!  Lastly, I popped the butterfly/flower image up on Pop Dots and the tag on Dimensionals.

The inside stamps are from Happy Everything and one more CC Designs butterfly.  These butterflies are so quick to color and really stand out!
Copic coloring:

Flower:  YR18, YR04, YR00, Y19, YG95, YG91  Butterflies:  Y19, Y15, YR04  Shadow:  C3, C1

Thanks for stopping by!

Tam


DETAILS
STAMPS:  CC Designs Butterfly; SU Bloomin' Beautiful, Small Script, Happy Everything
PAPER:  Neenah Solar White; SU Basic Black, Old Olive, Cajun Craze
INK:  Ranger Black Soot; SU Old Olive
ACCESSORIES:  Copic markers; Big Shot; Cuttlebug EF; sponge; SU tag punches; SU mat pack and paper piercer; Bazzill brads; Pop Dots; SU Dimensionals; Costco ribbon

Thursday, September 23, 2010

THINKING OF YOU

SmileyHey there, does everyone have their sunglasses handy?  You might want to grab them for this one!    OK, but I warned you.  *wink*

I felt the need to do a little sponging and this is what I came up with.  Love the butterflies...not so sure about the in-your-face, bright yellow.  I took it to work with me and set it on my desk to help me decide if I like it or not (I know, I'm weird!).  I decided that I like it, yellow and all.  It's a nice fall color, right?  (still trying to reassure myself...yikes!)

When my co-worker saw it she had to have it.  Her friend recently lost her 40ish year-old daughter to Breast Cancer and she wants to send her a card.  As someone who recently lost a parent, my heart goes out to the family.

The butterflies are from C.C. Designs and were stamped with Ranger Black Soot on Neenah Solar White.  They were colored with Copic markers (see below), cut out and set aside.
 
Next I used the leaves and grass stamps from Gina K's Hang in There set.  The leaves were stamped with VersaMark and embossed with clear embossing powder and the grass was inked with VersaMark and SU Barely Banana then embossed with clear embossing powder.  I sponged Barely Banana on the center of the panel.  SU So Saffron was sponged next on the outside working my way towards the center not covering all of the Barely Banana.  SU Summer Sun was sponged last around the outside working my way toward the inside not covering all of the So Saffron.  I used a paper towel to lightly wipe the ink from the embossed areas.

The sentiment is also C.C. Designs and was stamped with Ranger Soot Black in the corner leaving space for the brads which are Bazzill.  SU Dimensionals were used to pop up all of the butterflies.

Another of the butterflies in the set was stamped on the inside panel and colored with Copic markers.  Everything was layered (inside and out) to finish it off.

Thanks for stopping by!

Tam

ADDITIONAL INFO
STAMPS:  C.C. Designs Butterfly; Gina K's Hang in There
PAPER:  Neenah Solar White; SU Basic Black, Summer Sun
INK:  Ranger Black Soot; SU Barely Banana, So Saffron, Summer Sun
ACCESSORIES: Copic markers; VersaMark; clear EP; heat tool; sponges; Bazzill brads; SU Dimensionals

Related Posts Plugin for WordPress, Blogger...