Follow Along...

Showing posts with label WEDDING. Show all posts

Monday, November 9, 2015

LLLC - IT'S YOUR DAY!

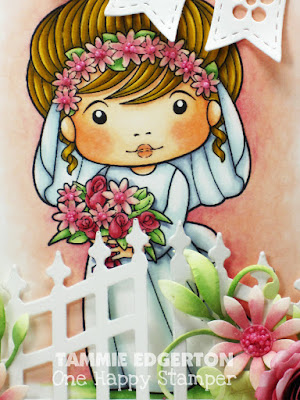
Hey there, La-La Land Crafts challenge for this week is Here Comes the Bride.  This is actually perfect timing...my hubby's long time bachelor friend is FINALLY getting married!  I never thought that would happen.  LOL!  He's a super nice guy, and I'm really happy for him!


Marci was stamped with Tuxedo Black onto Neenah Solar White then colored with Copic markers.  The frame was cut five times then adhered together for added dimension.  LLLC's Wrought Iron Fence was cut in half...I'm not sure if you can see from the picture, but the opening was bent outwards to mimic a gate.  A few My Favorite Things flowers were cut from Neenah, colored with Copics, shaped then adhered to the fence.  LLLC's Flower banner adds a little more festivity and a single bloom ties it all together.

COPIC COLORING: 
SKIN:  E11, E000, E0000, R30  HAIR:  Y28, Y26, Y23  CLOTHES:  BV20, BG70  FLOWERS:  R85, R83, R81, R000, G21, G20  BACKGROUND:  R85, R000

Thanks for stopping by! 


SUPPLIES: 
STAMPS:  LLLC Wedding Day Marci
PAPER:  Neenah Solar White
INK:  Copic markers; Memento Tuxedo Black 
ACCESSORIES:  Sizzix Big Shot; MFT Die-namics (Rectangle Frames, Upsey Daisies, Mini Royal Rose, Large Royal Rose, Simple Leaf Flourish, Royal Leaves); LLLC dies (Wrought Iron Fence, Flower Banner); Hot Mama Prills; Art Glitter Glue; Crafter's Pick The Ultimate glue; SU Dimensionals; adhesive
SIZE OF FINISHED PROJECT:  A2 (4 1/4" x 5 1/2")

Thursday, May 9, 2013

TAYLORED EXPRESSIONS MAY RELEASE DAY: CURLY SWIRLIES

Hey there, woohooooo...Happy Release Day!  The girls have really outdone themselves with this release...everyone's projects have been AMAZING!  Don't forget that starting today, all of the new dies and stamps are available for purchase in the Fresh out of the Oven section of the Taylored Expressions store.  Happy shopping!

I was given the task of creating two totally different projects using the same Curly Swirlies die.  Whoop whoop, I love this die...it's so elegant and could be used for so many different things!  This tag was simple and so fun to create!  A girl just NEEDS to get inky once in a while!  *grin*  The Tag Stacklets 1 die was used to cut two tags...one from card stock and the other from Bazzill's Antique Sheet Music then they were adhered together (the music paper was a little thin so the card stock was used for stability).  The swirls were cut from Copic Mask It and positioned on the tag before four colors of Memento ink were sponged and the masks removed.  The seam binding bow was died to match the top portion of the tag and a butterfly (Elegant Butterflies and Elegant Butterflies Overlays) with rhinestones that were colored with Copic markers finish the tag.  I decided not to go with a sentiment for now.  When I figure out what I want to use this for, I'll stamp/die cut a sentiment to attach to the top.


SUPPLIES: 
STAMPS:  None
PAPER:  Neenah Solar White; Bazzill (Raven Monochromatic, Antique Sheet Music); Vellum Cardstock
INK:  Copic markers; Memento (Summer Sky, Bahama Blue, Lulu Lavender, Grape Jelly) 
ACCESSORIES:  Spellbinders Grand Calibur; TE Taylored Dies (Curly Swirlies, Elegant Butterflies, Elegant Butterflies Overlays, Tag Stacklets 1); Copic Mask It; sponges; KaiserCraft Silver rhinestones (colred with BG07); Crop-A-Dile; seam binding; Tattered Angels Pearl Glimmer Mist; heat tool; Creative Impressions Black Twine; adhesive
TECHNIQUE(S):  Masking; sponging
SIZE OF FINISHED PROJECT:  3" x 5"

My good friend's nephew is getting married this summer so I wanted to make a card for him.  I think there's something really, really classy about a white on white wedding card, dont you?  OMGosh, I broke out so many dies to make this!  Ready for the rundown?  Fleur De Lis Accents from Spellbinders was used for the border and topped with the new Curly Swirlies die.  Die cut flowers from Friendship Blooms, Mini Leaves, Bugabee Flowers and even Flowerbox Sprigs & Flowers were used to create the beautiful cluster.  The flowers were shaped with a stylus, soft/spongy pad and tweezers.  I really love the look of dimensional flowers!  They are so much fun to create not to mention how amazing they look!  The sentiment is from the new Lifetime of Love stamp set and was die cut using the Tag Stacklets 1 die.  A corner of the tag was curled under and popped up on foam to give it a little shape.  A Sparklet makes a beautiful center for the big flower and silver rhinestones were used for the smaller flowers then a few extras were scattered around the card.  I just LOVE making wedding cards!  It's such a special occasion and deserves a special card!


SUPPLIES: 
STAMPS:  TE Lifetime of Love
PAPER:  Neenah Solar White
INK:  Memento Tuxedo Black 
ACCESSORIES:  Spellbinders (Grand Calibur, Shapeabilities Fleur De Lis Accents); TE Taylored Dies (Curly Swirlies, Friendship Blooms, Mini Leaves, Bugabee Flowers, Flowerbox Sprigs & FlowersTag Stacklets 1); Stamp-a-ma-jig; stylus/soft pad (to shape flowers); KaiserCraft Silver (Sparklets, rhinestones); Mini Glue Dots; Zig 2-Way Glue pen; SU Dimensionals; adhesive
SIZE OF FINISHED PROJECT:  A2 (4 1/4" x 5 1/2")

Need a little more inspiration?  Head on over to the Baker's Dozen blogs to see what they've been up to.  I'll see you back here again tomorrow for one last spotlight from this release!


Joan Ervin - Guest Designer
Tammie Edgerton - that's me!


Thanks for stopping by! 


Wednesday, May 8, 2013

TAYLORED EXPRESSIONS MAY SNEAK PEEK: SHADES OF THANKS DIE & LIFETIME OF LOVE

Hey there, it's Day 2 of the Taylored Expressions sneak peeks.  All of the new dies and stamps that you've seen over the last couple of days will be available for purchase tomorrow in the Fresh Out of the Oven section of the store!  I've got two projects to share with you today.  The first uses a die called Shades of Thanks.  The tree was die cut from the white Nestie panel and backed with a wood-grained pattern paper from Doodlebug.  Seem binding was died to match the green paper and a sentiment from TE Mani Mini - Occasions completes this CAS card.


SUPPLIES: 
STAMPS:  TE Many Minis - Occasions
PAPER:  Neenah Solar White; Bazzill Raven Monochromatic; Doodlebug Design Inc Flower Box collection
INK:  Memento (Tuxedo Black, Bamboo Leaves)
ACCESSORIES:  Spellbinders (Grand Calibur, Nestabilities Labels Twenty-Two); TE Taylored Dies (Shades of Thanks, Designer Mini Tags); slot punch; seam binding; Mini Mister (water); heat tool; Zig 2-Way Glue pen; SU Dimensionals; adhesive
SIZE OF FINISHED PROJECT:  5 1/4" x 5 1/4"

My second project uses the new Lifetime of Love set.  What a cute idea for a stamp set, huh?  The image was colored with Copic markers and the trees were paper pieced with the Flowerbox collection from Doodlebug.  Talk about a fun, bright wedding card!


COPIC COLORING:
SKIN:  E11, E01, E00  HER HAIR:  E59, E57, E53  DRESS/VEIL:  C3, C1, C00, 0  HAT:  C6, C4, C2, C0, BG09, B02, BG02  CAR:  Y17, Y15, Y13, Y11, R08, R05, R02, C6, C4, C3, C2, C1, C0, C00, BG70  CANS:  BG09, B02, BG02, R46, R43, G46, G43, G40  ROAD:  C6, C4, C2, C0  GRASS:  G46, G43, G40  SKY:  BG01, B00

SUPPLIES: 
STAMPS:  TE Lifetime of Love
PAPER:  Neenah Solar White; Bazzill Raven Monochromatic; Doodlebug Designs Inc. Flower Box collection
INK:  Copic markers; Memento Tuxedo Black 
ACCESSORIES:  Spellbinders Grand Calibur; TE Taylored Dies (Banner Stacklets 1); Stamp-a-ma-jig; paper snips; Zig 2-Way Glue pen; button from my stash; Creative Impressions Black Twine; SU Dimensionals; adhesive
TECHNIQUE(S):  Paper piecing
SIZE OF FINISHED PROJECT:  A2 (4 1/4" x 5 1/2")

That will do it for me today, but come on back tomorrow for a couple more projects!  The Baker's Dozen has some amazing projects to share, so make sure you check them out and say hi!


Thanks for stopping by! 


Sunday, August 26, 2012

TO THE HAPPY COUPLE...

Hey there,  I've got a lot of pictures to share with you today!  My hubby's niece just got married and this is the card/box I made for her.  It's a little different than what I normally create.  I love to color and, well, there isn't any on this project.  


Maegan's favorite color is purple (she even named her daughter Violet) so I worked in just enough with the sponging to make it pop.  I started with something totally different...gorgeous patterned paper in shades of lavender, but it just didn't come together.  I'm glad I didn't force it because I really like how this card turned out!


The sentiment is from an Our Craft Lounge set called The Journey.  It's a little unconventional for a wedding card...but it's the perfect message for the newlyweds!  The flowers are all My Favorite things dies, the pins are Maya Road and the other beads are from my stash.  I showed my hubby the finished card and he said it had a lot of bling.  I say pfft...really, is that even possible?  LOL!


Here's the inside...the embossed pocket holds a gift card.


Every paper crafter knows it's all about the presentation; am I right?  *grin*  An envelope would just not do for this beauty, so I set to work creating a little box. The sentiment on the box top was computer generated (it's the names of our niece and her groom and the date of their wedding).  The layers used on the card were also used on the box top, another seam binding bow and one tiny rose and leaf complete the box.  


I guess that's about it for this one.  Enjoy your day!

THIS PROJECT INCLUDES THE FOLLOWING CHALLENGES:
CRAFTY SENTIMENTS DESIGNS CHALLENGE BLOG ~ Flowers
CREATIVE INSPIRATIONS ~ Sentimental
CUTE CARD THURSDAY ~ Bling it Up!
DIVAS BY DESIGN ~ #49 Anything Goes
FAB 'N' FUNKY ~ #135 Use Leaves Somewhere
TUESDAY THROWDOWN ~ #112 Hip to be Square
PAPERTAKE WEEKLY CHALLENGE ~ Pins & Needles
SASSY CHERYL'S BLOG ~ #88 Show Me Thursday!
STAMP N DOODLE ~ Loaded with Layers
THE RIBBON CAROUSEL ~ RCC67 Bump it Up with Tracy Valure

Thanks for stopping by! SmileyCentral.com


SUPPLIES:
STAMPS:  OCL The Journey (enter the code "checkusout" to receive a discount off your entire purchase at Memories of Time)
PAPER:  Neenah Solar White; Bazzill Heidi Monochromatic
INK:  Memento Tuxedo Black, Sweet Plum
ACCESSORIES:  Sizzix Big Shot, embossing folder; MFT Die-namics Plentiful Petals, Royal Rolled Rose, Mini Royal Rose, Royal Leaves, Leafy Flourish; Nestabilities Picot Edge Circles, Standard Circles Small and Large; seam binding; Ranger Mini Mister (filled with water), Heat it craft tool; non-stick craft mat; sponge; Maya Road Trinket Pins-Antique Gem; beads from my stash; Mini and Micro Glue Dots; Zots; stylus; computer mouse pad; tweezers; Scor-Pal; Zig 2-way Glue pen; Best Glue Ever; SU Dimensionals; adhesive
SIZE OF FINISHED PROJECT:  Card = 5 1/2" x 5 1/2"; box = 6" x 6" x 2"

Thursday, November 18, 2010

JUST MARRIED

Hey there all you OCL Blog Hoppers!  If you have been following along from the beginning, I'm sorry to tell you I'm your last stop...I hope you had fun and picked up a tip or two along the way.  If you joined us somewhere in the middle, then keep going...there's still plenty more to see!  Well, today is the day that you get to find out what stamp set I'm giving away as blog candy, but I'm going to make you wait just a little bit longer...I know, doesn't seem fair, huh?


I mentioned last weekend that I took a class and learned a new-to-me technique that I couldn't wait to share.  Well, this is it!  Cami and Kisa (my OCL gurus) showed us how to put a colored image on a tealight candle.  OMGosh...it was so much fun (and easy)!  I couldn't wait to try it out on a little bit bigger candle.  Did you know that you can shade with your Copic markers on tissue paper?  Well, I tried it and you can!  How cool is that!?!


While I was coloring my tissue paper, I thought it would be a nice touch to include a couple champagne glasses and to decorate them to match the candle.  That got me thinking...gotta have a box to put everything in, right?  Bada bing, bada boom...I worked up a template and made the box.  I'm just glad there wasn't anyone at home when I made it.  Dang it if I didn't end up talking to myself!  Ha!

I'm really happy with the way it turned out.  But wait...that's not all!  Don't forget to check out the back.  See that white space above the car.  How cool would it be to include the bride and groom's names and the date of the wedding?  Go ahead, say it...PRICELESS! 


SUPPLIES
STAMPS:  OCL's Bird and Groom
PAPER:  Neenah Solar White; SU Real Red; Best Creation Inc Basic Glitter Paper DP
INK:  Black Soot Distress Ink
ACCESSORIES:  Copic Markers; tissue paper; candle; wax paper; heat tool; champagne glasses; heart charms from JoAnn's; rings from the Dollar Store; Big Shot; Nestabilities Standard Circles Small, Labels Three; ScorPal; transparency roll; ScorTape; Zots; EK Success border punch; assorted heart punches (for the confetti in the glasses); red ribbon from my stash; wired ribbon from Costco; Kaiser Scrapflowers; buttons from my stash


Have you figured it out yet???  The set I'm giving away as blog candy is Bird and Groom!  The same set I used to make this awesome wedding box!  How would you like to own this set?  All you have to do is leave a comment and make sure you leave your email address or be logged into Blogger so I know how to contact you.  If you left a comment on yesterday's post, you will have two chances at winning (one post per day/per blog please).  Each stop on the blog hop is giving away a different set so be sure to make the rounds and comment, comment, comment!  Only one set per winner.  You have until Saturday, November 20th, to comment on the blogs and winners will be selected on Sunday.  A complete list of winners will be posted on the OCL blog.


Check out all the fun stamps that comes with this set!  Now it's time to get hopping!

Amber HIllman
Bev Gerard
Broni Holcombe
Cambria Turnbow
Deb Felts

Debbie Corbari
Denise Marzec
Heather McNally
Jeanne Streiff

Joy Kennedy
Kendra Wietstock

Kisa Peters
Lori McAree
Pam Hooten

Tammie Edgerton  <-- that's me!


I'd like to include this project in the Creative Belli Challenge ~ Old, New, Borrowed or Blue!  (3 out of 4...I've had the glasses since the last wedding project I did, the candle technique is new-to-me and I borrowed the stamp set from a friend).

Thanks for stopping by and good luck!

Tam
Related Posts Plugin for WordPress, Blogger...