Follow Along...

Showing posts with label GET WELL. Show all posts

Tuesday, February 18, 2014

NOT FEELING BEARY GOOD?

Hey there, I've been eyeballing these adorable Benton Bear stamps from Inky Antics.  They've been sitting in the corner of Memories of Time and I finally broke down and bought them.  I'm glad I did because Recovering Benton is the perfect stamp for my hubby's coworker's wife (did you follow that?  *grin*) who is having surgery in a couple days.  We wanted to let her know we were thinking of her.  The inside sentiment, also from this set, is "hope you get well soon".


Benton was stamped with Tuxedo Black onto Neenah Solar White then colored with Copic markers.  It's the perfect size stamp and OMGosh, it colored up so quick!  Clear glaze pen was put on Benton's nose for a subtle shine.  The layout is Karen's Sweet Sunday Sketch #207...LOVE!  I also played along in A Gem of a Challenge's #113 Spots and Stripes and SCS's Love Fest challenge, Puppy Love (to share a warm, cuddly critter).

COPIC COLORING: 
BEAR:  E55, E53, E51  HOT WATER BOTTLE:  R08, R05, R02, C3, C1, C00  GRASS:  YG03, YG00, YG0000  SKY:  BG0000

Thanks for stopping by! 


SUPPLIES: 
STAMPS:  IA Recovering Benton
PAPER:  Neenah Solar White; Bazzill Raven Monochromatic 
INK:  Copic markers; Memento Tuxedo Black 
ACCESSORIES:  Sizzix Big Shot; MFT Die-namics (Fishtail Flag Stax, Fishtail Flags Layer Stax); Sakura Clear Glaze pen, KaiserCraft Black rhinestones; Scrapbook Adhesives by 3L Thin 3D Foam Squares; adhesive
SIZE OF FINISHED PROJECT:  A2 (4 1/4" x 5 1/2")

Wednesday, August 7, 2013

TAYLORED EXPRESSIONS AUGUST SNEAK PEEK - A CLASSY VIEW & CHALKBOARD ELEMENTS

Hey there, this is the final day of sneak peeks for the Taylored Expressions August Release.  You know what that means...all of the new products will be available for purchase tomorrow (08/08 at 8am PST).  If you want to check out the entire release, head on over to the Facebook Preview Party starting at 6pm PST tonight.


The bus/school image from A Classy View was stamped with Tuxedo Black and colored with Copic markers.  The Arched Window and apple from Falling for You were die cut and also colored with Copics.  Doesn't that apple look good enough to eat?  YUM!  The sentiment was stamped on a Banner Stacklets 1 die cut to complete the card.


COPIC COLORING: 
BUS:  Y17, Y15, Y11, Y00, BG72, BG70, 0, C3, C1, C00  SCHOOL:  R27, R24, R22, R21, E37, E34, E30, C3, C1, C00, BG72, BG70, 0, Y15  GRASS:  G28, G24, G21, G20, YG67, YG63, YG61  BUSHES:  G28, G24, G21, G20  TREE:  YG67, YG63, YG61, E37, E34, E30  SIDEWALK:  C3, C1, C00  SKY:  BG02, B0000  ARCHED WINDOW:  C3, C1, C00, 0  DIE CUT APPLE:  R27, R24, R22, R21, E37, E34, E30, G28, G24, G21, G20


SUPPLIES: 
STAMPS:  TE A Classy View
PAPER:  Neenah Solar White (aka Bazzill Coconut Swirl Smoothies); Bazzill Raven Monochromatic; Little Yellow Bicycle Head of the Class collection 
INK:  Copic markers; Memento Tuxedo Black 
ACCESSORIES:  Spellbinders Grand Calibur; TE Taylored Dies (Arched Window, Banner Stacklets 1, Banner Stacklets 2, Falling for You); Scrapbook Adhesives by 3L (3D Foam Squares, Thin 3D Foam Squares); Zig 2-Way Glue pen; adhesive
SIZE OF FINISHED PROJECT:  5 1/4" x 5 1/4"


My next project uses the new Chalkboard Elements set.  Sky's the limit on this one...there are literally TONS of different combinations!  To create the blackboard, I rubbed my Embossing Buddy over the card stock then stamped the scrolls/sentiments on Bazzill Raven Monochromatic with VersaMark, sprinkled it with white embossing powder then heat set it.  Once it was done, white pigment ink was rubbed over it to give it the chalky look.  Moka Melissa was stamped with Tuxedo Black, colored with Copic markers, fussy cut then adhered to the chalkboard frame.  The entire thing was popped up on foam.


COPIC COLORING: 
SKIN:  E11, E01, E00, R30  HAIR:  E44, E43, E42, E41  SHIRT, SHOES:  V25, V22, V20  LONG SLEEVE SHIRT, PANTS:  C3, C1, C00  HAT:  C3, C1, C00, R46, R43  CLIPBOARD:  R46, R43, E43  STETHOSCOPE:  R46, R43  ERASER:  C6, C4, C2, C0  SHADOW:  C3, C1, C00


SUPPLIES: 
STAMPS:  TE Chalkboard Elements, Melissa
PAPER:  Neenah Solar White (aka Bazzill Coconut Swirl Smoothies); Bazzill Raven Monochromatic 
INK:  Copic markers; Memento Tuxedo Black; VersaMark; SU Craft Whisper White
ACCESSORIES:  Spellbinders Grand Calibur; TE Taylored Dies (Blackboard & Accessories); paper snips; Stamp-a-ma-jig; SU Embossing Buddy; Imagine Crafts White Embossing Powder; Scrapbook Adhesives by 3L Thin 3D Foam Squares; SU Dimensionals; Zig 2-Way Glue pen; adhesive
TECHNIQUE(S):  Fussy Cutting; embossing
SIZE OF FINISHED PROJECT:  5 1/4" x 5 1/4"

I hope you liked my projects for today, see you back here tomorrow for Release Day!  Time to go give the Baker's Dozen some luv...later!


Thanks for stopping by! 


Wednesday, February 6, 2013

TAYLORED EXPRESSIONS FEBRUARY SNEAK PEEK: POSH POSIES

Hey there, what did you think of yesterday's peeks?  Pretty amazing, huh?  The Baker's Dozen gals are flippin' talented!  One more day before the February Release is available for purchase in the Fresh out of the Oven section of the Taylored Expressions store.

Today I'm sharing a project made with the new Embracing Grace Posh Posies set.  My manager at work is out due to a recent surgery, so I wanted to make her a get well card.  The Circles Cutting Plate makes for an awesome, no-fuss background and the Notepaper and Clipboard dies are a nice touch for an office manager, don't you think?  *grin*


Here's a close up...I'm still in my "white phase".  LOL!  I've been really into white with a pop of color lately.  The silver rhinestones were colored with an R27 Copic marker, the sentiment was stamped in Memento Lady Bug and the seam binding was was died to match.


SUPPLIES: 
STAMPS:  TE Posh Posies, Notepaper
PAPER:  Neenah Solar White; Bazzill (Raven Monochromatic, Metallic Silver)
INK:  Memento (Tuxedo Black, Lady Bug)
ACCESSORIES:  Spellbinders Grand Calibur; Taylored Dies (Circles Cutting Plate, Notepaper and Clipboard dies); Stamp-a-ma-jig; KaiserCraft Silver rhinestones (colored with R27); non-stick craft mat; mini mister (water); heat tool; SU Dimensionals; adhesive
SIZE OF FINISHED PROJECT:  A2 (4 1/4" x 5 1/2")

Time to check out the Baker's Dozen to see what they came up with...see you back here again tomorrow for Release Day!
Carole Burrage
Charmaine Ikach
Jen Shults
Kerri Michaud
Lynnette Kauffman
Sankari Wegman
Shannon White
Shelly Mercado
Stephanie Kraft
Tammie Edgerton (that's me)
Taylor VanBruggen
Wanda Guess

Thanks for stopping by! 

Tuesday, October 9, 2012

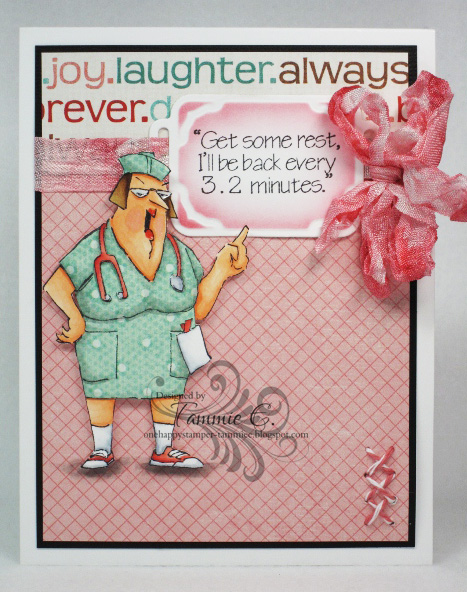
HYCCT1209 GET SOME REST...

Hey there, I don't usually do a lot of funny cards and I never, never, NEVER sew (I admire those that make it look so effortless, but I can't sew!)...so Patricia's (aka PH in VA) You Had Me In Stitches was a real challenge!  You might have already figured out that she wants us to make funny cards that has "stitches" on it whether real or faux.  I found this Art Impressions stamp and knew it was the one.  She's a hoot!  *grin*  As for the stitching...I just did a couple hand stitched X's in the corner.  The nurse was fussy cut out and popped up on foam.  Her uniform was paper pieced then shaded with Copic markers.


Here's the inside... 


COPIC COLORING: 
SKIN:  E02, E01, E00, R30  LIPSTICK:  R22  GLASSES:  BG70  HAIR:  E37, E34, E31  SCRUBS/HAT:  T3, T2, T0  STETHOSCOPE:  R24, R22, R21, R20, C2, C0  CLIP:  R22  PAPER:  C2, C0, 0  SOCKS:  C2, C0, 0  SHOES: R24, R22, R21, R20, C2, C0  SHADOW:  T2, T0

Thanks for stopping by! 


SUPPLIES: 
STAMPS:  AI UM4100
PAPER:  Neenah Solar White; Bazzill Raven Monochromatic; My Mind's Eye Just Dreamy 2 collection (Sweet Life Paper, Enchanting "My Love" My Friend, Blushing Paper)
INK:  Memento (Tuxedo Black, Lady Bug)
ACCESSORIES:  Copic markers; Sizzix Big Shot; Shapabilities Ribbon Tag Trio Two; sponge; paper snips; hobby blade (Punch Bunch tool kit); seam binding; Mini Mister (water); heat tool; Sakura Clear Glaze pen; Zig 2-way Glue pen; Sakura Quickie Glue pen; SU Dimensionals; The Twinery Strawberry twine; SU Mat Kit/paper piercer; adhesive
TECHNIQUE(S):  Paper piecing; fussy cutting; sponging; sewing
SIZE OF FINISHED PROJECT:   A2 (4 1/4" x 5 1/2")

Saturday, December 17, 2011

OUCH!

Hey there, wasn't the Our Craft Lounge Sneak Peek / Blog Hop freakin' amazing???  OCL girls are SO very talented!  Here's a card I made with the single called Boo-Boo.  Isn't he the cutest?  I teamed him up with Oriental Garden, one of OCL's retiring sets.  I think they look awesome together!


Here's the inside...another one that doesn't have much to it...just enough to tie it together with the front.


Copic coloring:

Panda: R30, 0, W1, W00, C3, C1, C00 Bamboo: G21, YG23, YG21 Inside image: YR01, YR00, YR000, YR0000


Thanks for stopping by!Panda 


SUPPLIES
STAMPS: OCL Boo-Boo (enter the code "checkusout" to receive 20% off your entire purchase at Memories of Time), Oriental Garden (40% off in the OCL online store) 
PAPER: Neenah Solar White; SU Gable Green;
INK: Memento Tuxedo Black; SU Green Galore
ACCESSORIES: Copic markers; Spellbinders Grand Calibur, Nestabilitis Petite Ovals Small, Petite Ovals Large; Big Shot; Cuttlebug embossing folder; EK Success border punch; seam binding; Mini Mister (water); craft mat; heat tool; SU Dimensionals; Mini Glue Dots; Zots; Creative Charms Vintage Accents brad; adhesive
TECHNIQUE(S):  Fussy cutting
SIZE OF FINISHED PROJECT:  5" x 5"

Saturday, October 8, 2011

HANG IN THERE!

Hi there, it's time for another card Hope You Can Cling To breast cancer card drive over at Splitcoast Stampers.  I'm hoping to get a couple more done over the weekend so I can mail them to the hospital in Texas on Monday.  It is such a great cause!  Today Wanda is challenging us to "Hang in There".  She wants us to create a card or 3-D project with a hanging image or hanging element.  Monkey Around from Our Craft Lounge is perfect for that!

It took a little creative planning for masking this image.  I had to think about what was holding what where and what needed to be on top blah, blah, blah.  Ha!  Anyway, everything was stamped on white card stock and colored with Copic markers.  A small tree branch and both monkey's heads were stamped twice and colored so they could be popped up on foam.


The ribbon the monkey is holding is from the OCL set called Granny's Support Team.  It was the perfect size for her to hold!  A tag, button from my stash and twine bow completes the card.


Copic coloring:

Tree:  E59, E57, E55, YG67, YG63, YG61, YG95, YG25, YG23  Boy monkey:  R30, E47, E44, E43, E40  Girl monkey (inside and out):  R30, E39, E37, E35, E30, R11, R10  Ribbon:  RV11, RV10, RV000  Sky:  R0000

This project also includes the following challenges:

Crafty Boots ~ Zoo or Animal Theme
Crazy Amigo Challenge ~ Animals
Delightful Challenges ~ Make it Dimensional
Divas by Design ~ Button Up!
Little Miss Muffet Challenges ~ Animals or Monsters
Thanks for stopping by! SmileyCentral.com


SUPPLIES
STAMPS:  OCL Monkey Around, Granny's Support Team
PAPER:  Neenah Solar White; Bazzill Raven Monochromatic; Three Bugs in a Rug Lazy Summer Little Bug
INK:  Memento Tuxedo Black
ACCESSORIES:  Copic markers; Big Shot; Sizzix Scallop Tag embosslit; sticky notes for masks; paper snips; SU Dimensionals; Glossy Accents; Sakura Clear Glaze Pen; Star Dust Stickles; The Twinery Honeydew and Blossom twine; button from my stash; Micro and Mini Glue Dots; Tulip glass rhinestones; adhesive
SIZE OF FINISHED PROJECT:  A2 (4 1/4" x 5 1/2")

Friday, June 3, 2011

BLOG HOP

Hello there stampers!  Today is day two of the Sneak Peek/Blog Hop over at Our Craft Lounge.  If you've hopped along from the beginning, you would have started at The Lounge (OCL blog) then found your way to me via Stephanie's blog.  So are you excited with what you've seen for this mini-release?  Total cuteness, right!?!


The set I'm showing today is called Slow & Steady.  Seriously...it's my most favoritest in the release.  Talk about versatility!  There are five...count them five...sentiments that can fit on the turtle's shell.  The dotted pattern is separate and can be stamped towards the top or bottom of the shell...or not at all!  And let's not forget about all those accessories!  They really add a lot of character to your scene!  And how about those adorable bugs?  Don't you just want to pinch their little cheeks?

The turtle and bugs were masked and stamped onto Neenah Solar White card stock then colored with Copic markers.  I went "out of the box" with the dragonfly's wing and sparkled them with Stickles.  The ladybug has a thick coat of Glossy Accents as do the turtle's toenails.  A Sakura Glaze pen was used on all of their eyes.

Copic coloring:


Turtle: R20, YG95, YG93, YG91, E47, E44, E43 Ladybug: R20, R29, R27, R24, C5, C3, C1 Dragonfly: R20, V25, V20, BG000, BG0000 Grass: YG95, YG93, YG91 Sky: B00, B000, B0000

This little get well turtle was done more or less the same as the first...stamped on Neenah and colored with Copics then cut out.  The tissue box was "paper pieced" to match the background.  I cut a slit in the top of the box and put in a piece of Charmin...I know, I probably should have used a Kleenex, but hey, it's what was handy.  *snort*

The turtle's toenails have Glossy Accents on them and it's eyes have clear Sakura Glaze.  Spellbinder's Nestabilities were used to cut out the shapes and the circle was sponged before it was removed from the die.  Both the circle and the turtle were popped up with Foam Squares.


Copic coloring:

Turtle: R20, YG95, YG93, YG91, E47, E44, E43


And now for my last card...I totally CASED our very own Deb Felts!  I fell in love with her layout so I bummed it.  Thanks, Deb!  SmileyCentral.com

Everything was masked and stamped on Neenah card stock and colored with Copic markers.  I used the "out of the box" technique again.  The dragonfly was stamped three times and the wings colored, Stickled then layered.  The ladybug, balloons and toenails all have Glossy Accents and their eyes all have clear Glaze Sakura pen.  The rhinestones are from Bazzill and the twine is from The Twinery (love that stuff!).  The Treat Yourself sentiment comes from OCL's Life is Sweet set.  I figured since it was still on my desk from yesterday's Sneak Peek, I would get one more use out of it.

I tried to get a good close-up of the dragonfly's layered wings (click on the pic for a better view).  Check out the Glossy Accents on the ladybug and the transparent balloons.  Pretty cool, huh?


Copic coloring:

Turtle: R20, YG95, YG93, YG91, E47, E44, E43 Ladybug: R20, R29, R27, R24, C5, C3, C1 Dragonfly: R20, V25, V20, BG000, BG0000  Present:  V25, V20, R85, R83, R81, YG06, YG03  Balloons:  R85, R83, R81, YG09, YG06, YG03, B05, B02, B00  Grass: YG95, YG93, YG91 Sky: B00, B000, B0000


Well, I guess that's it.  Are you ready to see what the complete set looks like?  Here it is...

Don't forget, after you're done leaving me some luv, head back over to The Lounge and make sure you leave a comment there for more chances to win one of these cool new stamp sets from the mini-release.  Make sure you let them know which is your fav set (uh...I think you know which one is mine  Laugh) and what you like about it.  You have until Sunday to leave comments on all of the participating Design Team's blogs and also the OCL blog.  Winners will be posted on Monday, June 6th.


Thanks for stopping by and have a great weekend!


SUPPLIES
STAMPS:  OCL's Slow & Steady, Life is Sweet
PAPER:  Neenah Solar White; SU Basic Black; S E I Doodley-doo Girl DP (double sided)
INK:  Memento Tuexedo Black; SU Creamy Caramel, Close to Cocoa, Chocolate Chip, Marina Mist
ACCESSORIES:  Copic markers; Big Shot; Spellbinder's Grand Calibur, Nestabilities; Cuttlebug embossing folder; sponges; Star Dust Stickles; Glossy Accents; clear Glaze Sakura pen; paper snips; Foam Squares; Bazzill Blackbird rhinestones; Micro Glue Dot; Charcoal twine from The Twinery; square punch; corner rounder punch
SIZE OF FINISHED PROJECT:  A2 (4 1/4" x 5 1/2")

Monday, August 16, 2010

OCLDT26 - SUNSHINE CHEER

It's been a while since I've done an Our Craft Lounge (OCL) challenge card and I'm glad I did this one.  It was so much fun!  My friend's mom recently had surgery so this will be perfect for her!free smileys


If you haven't heard, OCL has a weekly challenge (a new layout every Friday).  You can find details here.  You even have a chance to win a cool OCL stamp set if you play along!

This was a pretty simple card.  I punched three small circles then used Black Soot ink to stamp the images from OCL's Sunshine Cheer set.  I colored with Copic markers and drew in highlights with a white gel pen (they didn't pick up too well in the pic...you might be able to see them if you click on the pic to make it bigger).  I glued Sparkly Fluff onto the cloud.  Punched three black circles and the red CS, layered everything, paper pierced my layers, added a ribbon and popped up my circles with Dimensionals.


Thanks for looking!


Tam

ADDITIONAL INFO


STAMPS:  OCL Sunshine Cheer
PAPER: Neenah Solar White; SU Black, Real Red, Summer Sun; SU DP
INK:  Ranger Soot Black
ACCESSORIES:  Copic markers; OCL Sugar Sparkly Fluff; Glossy Accents; white gel pen; EK Success punch; Creative Memories punches; ribbon (probably JoAnn's); SU Mat Pack and paper piercer; SU Dimensionals


Related Posts Plugin for WordPress, Blogger...