Follow Along...

Showing posts with label CALENDAR. Show all posts

Friday, August 2, 2013

DTGD13Eggette - HOW THE DUCK ARE YOU?

Hey there, I'm thrilled to be participating this year in Splitcoaststampers 8th Annual Dare to Get Dirty challenges!  DTGD is our way of saying thanks to the most amazing Fan Club members ever!  So what's this about, you ask?  Easy...it's all about you, silly!  Our Dirty Dozen Designers, both past and present, have gotten together and planned a super fun week for you!  Besides the stamping end of it, the girls will be hanging out in the chat threads waiting to dish the dirt!  Yep...if you've ever wondered how someone does something, ask away...we'd love to share our dirty little secrets with you!  Everyone will be able to see our DTGD projects, but only the Fan Club members will be able to see what the specific challenge details are or participate in the challenges!  Come join in the fun!  Not a member but want to be?  Not a problem...join here!  Ooohhhh...and did I mention prizes?  I thought that might have gotten your attention!  *grin*  Click here for more info!

Wow...has it been a week already?  This is the last day that challenges will be posted but there's still time to play along!  This one is for Bonnie's (Eggette) challenge.  OMGosh, I just LOVE this stamp from Whipper Snapper Designs, Ducks in a Row!  The expression on that little one's face is priceless!  You can totally tell he's the rebel rouser in the group...just look at his mom...she's not impressed!  Ha!


The ducks were stamped with Tuxedo Black onto Neenah card stock then colored with Copic markers.  I went with a super simple layout...small rhinestones were added in between the scalloped border and a Sparklet was placed over the twine bow.  The sentiment was computer generated then cut out with a Taylored Expressions Conversation Bubble.  Kinda fun, huh?


COPIC COLORING: 
DUCKS:  Y26, Y23, Y21, YR68, YR15, YR12  GROUND:  W3, W1, W00  WORD IN BUBBLE:  YR68, YR15, YR12

How the DUCK are you?  *snort*  Be back shortly with another DTGD card...stay tuned!

Selected as SCS Favorites ~ Best of 2013!

Thanks for stopping by! 


SUPPLIES: 
STAMPS:  WSD DUCKS IN A ROW
PAPER:  Neenah Solar White; Bazzill Raven Monochromatic; My Mind's Eye Notable collection
INK:  Copic markers; Memento Tuxedo Black 
ACCESSORIES:  Spellbinders Grand Calibur; TE Taylored Dies (Medium Scallop Border; Delightful Day Conversation Bubbles); computer/printer (for the sentiment); Creative Impressions Black Twine; KaiserCraft Ebony Sparklet; Bazzill Blackbird rhinestones; SU Dimensionals; adhesive
SIZE OF FINISHED PROJECT:  5 1/4" x 5 1/4"

Monday, July 29, 2013

DTGD13BevMom - CHILLAXIN'

Hey there, I'm thrilled to be participating this year in Splitcoaststampers 8th Annual Dare to Get Dirty challenges!  DTGD is our way of saying thanks to the most amazing Fan Club members ever!  So what's this about, you ask?  Easy...it's all about you, silly!  Our Dirty Dozen Designers, both past and present, have gotten together and planned a super fun week for you!  Besides the stamping end of it, the girls will be hanging out in the chat threads waiting to dish the dirt!  Yep...if you've ever wondered how someone does something, ask away...we'd love to share our dirty little secrets with you!  Everyone will be able to see our DTGD projects, but only the Fan Club members will be able to see what the specific challenge details are or participate in the challenges!  Come join in the fun!  Not a member but want to be?  Not a problem...join here!  Ooohhhh...and did I mention prizes?  I thought that might have gotten your attention!  *grin*  Click here for more info!

I'm back today with a card for Bev's (BevMom) challenge.  Wowsers...it's the end of July and this is the first Christmas card that I've made!  I usually make a bunch of "Christmas in July" cards, but not this year!  *gasp*  I guess since this was my first, I had to make it count, right?  I absolutely LOVE how this card turned out!  The image is Ski Bear from Whipper Snapper Designs.  Way too cute!  I know, I know...I say that about all of their stamps!  Ha!  The bear was stamped onto Neenah card stock with Tuxedo Black then colored with Copic markers.  Banners were cut to line the top of the card.  The paper is from Little Yellow Bicycle and it isn't even Christmas paper...talk about a perfect match!  Two snowflakes were die cut, colored with Copic markers, popped up between layers then a Sparklet was placed on top.  A little bit of Stickles, for the snow, completes the card.


COPIC COLORING: 
BEAR:  BV20, BG70, 0  HAT/SCARF:  R85, R83, R81, BV25, BV23, BV20  SKIS/POLES:  BV25, BV23, BV20  SKY:  BG75, BG72, BG70  SNOWFLAKE:  R85, R83, R81

Sakura Clear Glaze pen gives his nose a soft, subtle shine.  I don't usually color the whole background area, but the BGs are such pretty colors, I just got carried away!  I'll be back again tomorrow with another DTGD project...see ya then!  (PS...this was one of my favorite projects that I made for the DTGD challenges!)

Thanks for stopping by! 


SUPPLIES: 
STAMPS:  WSD Ski Bear
PAPER:  Neenah Solar White; Bazzill Raven Monochromatic; Little Yellow Bicycle Poppy collection
INK:  Copic markers; Memento Tuxedo Black
ACCESSORIES:   Spellbinders Grand Calibur; MFT Die-namics Jumbo Fishtail Banner Stax; TE Taylored Die Make a Snowflake; Sakura Clear Glaze pen; KaiserCraft Silver Sparklet; Star Dust Stickles; SU Dimensionals; adhesive
SIZE OF FINISHED PROJECT:  5 1/4" x 5 1/4"

Wednesday, July 3, 2013

APRIL CALENDAR PAGE

Hey there, I'm back with one more Taylored Expressions Perpetual Occasions Calendar page.  I think I'm half way finished now!  When it's done, I'm hoping to turn this calendar into a class project at a retreat my LSS is putting together.  We'll see...  I started by punching a circle out of Mask It then sponging Dandelion and Cantaloupe ink for the sun.  Bless Your Nest and Leafy Branch dies were used to create the die cut scene and a little bit of Copic coloring on the eggs complete the page.


COPIC COLORING: 
EGGS:  E44, E43, E42, E41

Thanks for stopping by! 


SUPPLIES: 
STAMPS:  None
PAPER:  Neenah Solar White; Bazzill Raven Monochromatic 
INK:  Copic markers; Memento (Dandelion, Cantaloupe)
ACCESSORIES:  Spellbinders Grand Calibur; TE Taylored Dies (Bless Your Nest, Leafy Branch); TE Perpetual Occasions Calendar; 1 1/4" circle punch; Copic Mask It; sponges; paper snips; Zig 2-Way Glue pen; adhesive
TECHNIQUE(S):  Masking; Sponging
SIZE OF FINISHED PROJECT:  4" x 4" (top panel)

Sunday, June 30, 2013

MORE PERPETUAL CALENDAR PAGES

Hey there, happy Sunday!  Before I get started showing you more Taylored Expressions Perpetual Calendar pages, I would like to say goodbye to Google Reader.  *sniff*  Thanks to all of you that have been following my blog...if you are interested in continuing your subscription, you may want to consider trying Bloglovin'.  There is a new widget on the right hand side of my blog for you to follow me on Bloglovin' OR if you want to import your Google Reader to Bloglovin' so you can continue to follow all of your favorite blogs, follow this link.  It's really easy and only takes a few minutes, but you have to do it tonight!

Now on to the calendar pages...I've been having a blast making these pages!  The June page is a sponged sunset and the Beach Border silhouette die.  LOVE!  The sun was punched from Copic Mask It.  Several Memento inks (see supply list below) were sponged for the sky, the mask was removed and ink sponged onto the sun to soften it.  The border die cut completes the page...easy!


SUPPLIES: 
STAMPS:  None
PAPER:  Neenah Solar White; Bazzill Raven Monochromatic 
INK:  Memento (Dandelion, Cantaloupe, Peanut Brittle, Potter's Clay, Ladybug)
ACCESSORIES:  Spellbinders Grand Calibur; TE Taylored Dies (Beach Border); TE Perpetual Occassions Calendar; 1 1/4" circle punch; Copic Mask It; sponges; paper snips; Zig 2-Way Glue pen; adhesive
TECHNIQUE(S):  Masking; sponging
SIZE OF FINISHED PROJECT:  4" x 4" (top panel)

I had a snow flurry in mind when making the January page (probably because it's been stinkin' hot here on the Oregon Coast!).  I started off using a toothbrush to spritz colorless masking fluid onto the panel.  Once it was dried, Memento London Fog was sponged over the entire panel then the masking fluid was rubbed off.  Make a Snowflake dies were cut from glitter card stock then adhered directly to the panel.


SUPPLIES: 
STAMPS:  None
PAPER:  Neenah Solar White; Bazzill Raven Monochromatic; White Glitter card stock 
INK:  Memento London Fog 
ACCESSORIES:  Spellbinders Grand Calibur; TE Taylored Dies (Make a Snowflake); TE Perpetual Occassions Calendar; Winsor & Newton Colourless Art Masking Fluid, toothbrush, sponge; Ebony Sparklet; KaiserCraft Silver rhinestone; Zig 2-Way Glue pen; adhesive
TECHNIQUE(S):  Masking; sponging
SIZE OF FINISHED PROJECT:  4" x 4" (top panel)

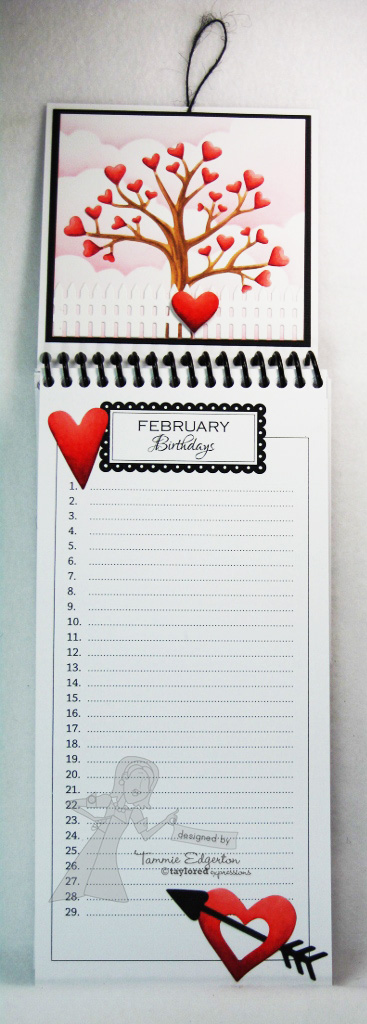
The last one for today is February.  For such a tiny little panel, it sure has a lot going on!  The Cloud Border die was used to create the sponged background.  Love Tree was cut, colored with Copic markers then adhered directly to the sponged panel.  The Picket Fence Border was adhered over the tree and a heart from Cupid's Arrows was popped up on foam.


COPIC COLORING: 
TREE TRUNK:  E27, E25, E23, E21  HEARTS:  R39, R35, R32

SUPPLIES: 
STAMPS:  None
PAPER:  Neenah Solar White; Bazzill Raven Monochromatic 
INK:  Copic markers; Memento Angel Pink 
ACCESSORIES:  Spellbinders Grand Calibur; TE Taylored Dies (Love Tree, Cupid's Arrows, Cloud Border, Picket Fence Border); TE Perpetual Occassions Calendarsponge; Zig 2-Way Glue pen; SU Dimensional; adhesive
TECHNIQUE(S):  Sponging
SIZE OF FINISHED PROJECT:  4" x 4" (top panel)

Thanks for stopping by! 


Tuesday, May 21, 2013

TAYLORED EXPRESSIONS MAY STUDIO CHALLENGE


Hey there, it's time for the Taylored Expressions Baker's Dozen Studio Challenge (a monthly opportunity for the DT to share what makes our stamping studios hum...each month we're asked a fun, crafty question so we can share our favorite products, tips/tricks, stamping advice and more).


The question for May is:
What is your favorite time of the year?  Some of us love the sunshine and heat and summer, while some of us long for the crisp cool air of fall.  Do spring flowers make your heart sing or is it snow and the smell of pine needles that makes you jolly?  Tell us about your favorite month or season and also tell us about your favorite time of year to stamp.


My favorite time of year has always been the fall.  I love seeing the trees turn the most beautiful shades of yellow, orange and red before falling to the ground.  Last year, for my first month on Splitcoaststampers Dirty Dozen, I made a card with a leaf falling into a puddle...well, I thought I would CASE myself to make a page for my perpetual calendar.  


Three circle Nesties were cut to use as masks.  The background was sponged with Summer Sky.  The first mask was set into place then Bahama Blue and Paris Dusk were sponged to create a ring (the same steps were used to create the other two rings).  The leaves were colored with Copic markers before being shaped with a stylus and computer mouse pad.  A piece of foam was placed under the centers and the tips curled back for extra dimension (of course that you can't see it in these pictures).  Glossy accents were put on the leaf to mimic rain drops.


COPIC COLORING: 
MAPLE LEAF:  G28, G24, G21, G20, YR15, YR12  OAK LEAF:  G28, G24, G21, G20, E23

SUPPLIES: 
STAMPS:  None
PAPER:  Neenah Solar White; Bazzill Raven Monochromatic 
INK:  Copic markers; Memento (Summer Sky, Bahama Blue, Paris Dusk) 
ACCESSORIES:  Spellbinders (Grand Calibur; Nestabilities Standard Circles Small); TE Taylored Dies (Mini Leaves); Creative Impressions Black Twine; sponges; PC mouse pad/stylus (to shape leaves); SU Dimensionals; Zig 2-Way Glue pen; Glossy Accents; adhesive
TECHNIQUE(S):  Masking; sponging
SIZE OF FINISHED PROJECT:  4" x 4" (top panel)

My favorite time of year to stamp...also the fall.  Actually, fall through winter and into the spring.  My hubby and I spend a lot of time at our friend's property up the Coos river from late spring through late summer/early fall.  When salmon season rolls around, hubby is off fishing and I take to my stamping room.  He spends every minute he can fishing for Chinook Salmon.  His season usually lasts a couple of months then he gets ready for a couple months of Steelhead fishing.  Between hubby's fishing obsession and the rainy days on the Oregon coast, I have months of guilt free stamping!  *grin*


I made a second page for my perpetual calendar showing a pretty winter scene.  I'm in love with the Birch Tree Border die and couldn't wait to use it again!  The trees were cut out of Neenah Solar White and colored with Copic markers then set aside.  I flicked some masking fluid onto the background panel with a toothbrush.  I had a little too much on the brush and a big blob dropped onto the panel...oops!  No worries...I like the different sized drops!  Since the inks were still out from the puddle/leaf page, I used them again.  All three inks were sponged onto the panel (after the masking fluid dried completely) then the masking fluid was rubbed off to reveal the snow filled sky.  So fun!  A scrap of Neenah was torn to create the snowy ground (Stickles were used on the torn edge).  The trees were popped up on foam and a Make a Snowflake was used to complete the calendar page.  The snowflakes all have Stickles and a rhinestone on them.


COPIC COLORING: 
BIRCH TREES:  E43, E41  

SUPPLIES:  
STAMPS:  None
PAPER:  Neenah Solar White; Bazzill Raven Monochromatic 
INK:  Copic markers; Memento (Summer Sky, Bahama Blue, Paris Dusk) 
ACCESSORIES:  Spellbinders Grand Calibur; TE Taylored Dies (Birch Tree Border, Make a Snowflake); Creative Impressions Black Twine; Windsor & Newton Colourless Art Masking Fluid; toothbrush; sponges; Star Dust Stickles; KaiserCraft (Sparklet, silver rhinestones); SU Dimensionals; Zig 2-Way Glue pen; adhesive
TECHNIQUE(S):  Masking; Sponging
SIZE OF FINISHED PROJECT:  4" X 4" (top panel)

I guess that does it for me.  Go check out the amazing projects from the Baker's Dozen...find out their favorite time of the year and when they like to get inky!


Thanks for stopping by! 


Related Posts Plugin for WordPress, Blogger...