Follow Along...

Showing posts with label VALENTINE'S DAY. Show all posts

Monday, February 8, 2016

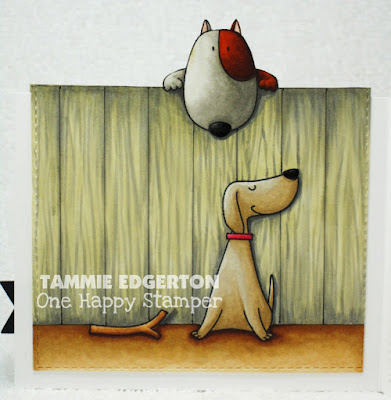
YOU MAKE MY TAIL WAG

Hey there, I played along with this week's My Favorite Things Sketch #266 Challenge.  Wowsers, this sketch was awesome with it's wide open spaces!  I had an idea in mind for my card and even had an awesome wood-grain paper picked out for the fence, but then I ran across a video by Sandy Allnock.  After seeing Sandy's Copic colored fence, I decided to give it a try.  I lined everything up with my MISTI, and dang if that didn't make for a cool way to create an inside/outside card!  I can't wait to do another!  I think I have an AI image that I might need to dig out and try!  Stay tuned...


Here's the inside...a little sponging for the clouds completes the card.  So fun!


COPIC COLORING:
BOY DOG:  E18, E39, E97, W3, W1, W00, R30  COLLAR, BOWL:  B26, B24, B23  DOGHOUSE:  E25, E23, E21, T10, T7, T4  BONE:  E42, E41, E40  GROUND:  E18, E34, E31, E30  FENCE:  E81, T3, T2  GIRL DOG:  E42, E41, E40  NOSES:  T10, T7, T4   COLLAR:  RV17, RV14, RV13  STICK:  E25, E23, E21

Thanks for stopping by!


SUPPLIES:
STAMPS:  MFT Birdie Brown You Make My Tail Wag
PAPER:  Neenah Solar White; Bazzill
INK:  Copic markers; Memento (Tuxedo Black, Summer Sky)
ACCESSORIES:  Sizzix Big Shot; MFT Die-Namics (Blueprints 24, Fishtail Flag Stax, Jumbo Cloud Stax); MISTI; ruler; Black Copic Multiliner .03; scissors; Ranger Mini Blending Tool; sponge; Imagine White Embossing Powder; heat tool; Sakura Clear Glaze pen; Doodlebug Design Inc Lily White Sprinkles; Scrapbook Adhesives by 3L Thin Foam Squares; Art Glitter glue; adhesive
TECHNIQUE(S):  Inside/outside; embossing
SIZE OF FINISHED PROJECT:   A2 (4 1/4" x 5 1/2")

CAS363 - FRECKLES

Hey there, I finally got the pictures for my last card for the SCS CAS challenge, Won't You Call Me Sweetheart.  This challenge is all about the sweethearts in our lives...create a Valentine and include a heart then head to the CAS Forum to play along!


This little cutie pie was stamped with Tuxedo Black onto Neenah Solar White, colored with Copic markers then fussy cut and popped up on foam.  Super easy peasy background makes for a quick Valentine!

COPIC COLORING:
SKIN:  E11, E00, E0000, R30  HAIR:  E25, E23, E21  HAIR BOWS, SHIRT, SOCKS:  R37, R35, R32  SKIRT:  R37, R35, R32, R85, R83, R81  SHOES:  T2, T0, R83  LOVE BANNER:  BG72, BG70

Thanks for stopping by!


SUPPLIES:
STAMPS:  C.C. Designs Freckles
PAPER:  Neenah Solar White; Bazzill; Doodlebug Design Inc Sweet Things
INK:  Copic markers; Memento Tuxedo Black
ACCESSORIES:  Scissors; glass cutting plate; X-Acto Knife; Zig 2-Way Glue pen; Scrapbook Adhesives by 3L Thin Foam Squares; adhesive
TECHNIQUE(S):  Fussy cutting
SIZE OF FINISHED PROJECT:  A2 (4 1/4" x 5 1/2")

Sunday, February 7, 2016

CAS363 - TROPICAL LOVE SHAKER

Hey there, here's card number two for this week's CAS challenge, Won't You Call Me Sweetheart.  This is such an adorable image from Whipper Snapper Designs!  I decided to make a shaker card for this one.


The fish were stamped with Tuxedo Black onto Neenah Solar White then colored with Copic makers.  I have to confess...the bottom red heart bled out.  No amount of Colorless Blender was going to fix that mess!  I was too far along with the image to scrap it though.  The background water was colored a little heavier in that area to cover it up.  Not too bad though, you can barely see where it went out of the line!  Whew!

COPIC COLORING:
GIRL FISH:  R85, R83, R81, Y11, Y00, YG03  BOY FISH:  YR18, YR15, YR12, Y11, Y00, YG03  SEAWEED:  YG67, YG03, YG0000  SAND:  E57, E55, E51  HEARTS:  R24, R22, R21  WATER:  B52, BG11, BG70

Thanks for stopping by...head to the CAS Forum to play along!


SUPPLIES:
STAMPS:  WSD Tropical Love
PAPER:  Neenah Solar White; Doodlebug Design Inc Flower Box; acetate
INK:  Copic markers; Memento Tuxedo Black
ACCESSORIES:  Sizzix Big Shot; MFT Die-Namics (Pierced Circle Frames, Circle Stax 2, LJD-Rustic Hearts); Doodlebug Design Inc Lily White Sprinkles; TE Formula for Love sequins; OCL Chunky Red glitter; Sakura Clear Glaze pen; Art Glitter glue; Zip Dry; adhesive
TECHNIQUE(S):  Shaker card
SIZE OF FINISHED PROJECT:  5 1/4" x 5 1/4"

CAS363 - HAPPY MAIL

Hey there, happy Sunday!  Believe it or not...I have THREE cards for this week's CAS challenge, Won't You Call Me Sweetheart, to create a Valentine and include a heart.  Have you seen the super cute Stamping Bella Stuffies?  This is Harry...he's totally adorable!  This card also fits into this week's Bellarific Friday Love is in the Air challenge.


Harry was stamped with Tuxedo Black onto Neenah Solar White then colored with Copic markers.  I'm in LOVE with My Favorite Things Mini Scallop Stax!  I just can't get enough of them!


COPIC COLORING:
BEAR, GROUND:  E57, E55, E53  NOSE:  C6, C4, C2, C0  HEART:  R24, R22, E21  ENVELOPE:  BV20, BG70

Thanks for stopping by, head to the CAS Forum to play along!


SUPPLIES:
STAMPS:  SB Harry the Stuffie Gets Happy Mail
PAPER:  Neenah Solar White
INK:  Copic markers; Memento Tuxedo Black
ACCESSORIES:  Sizzix Big Shot; MFT Die-Namics (Square Stax Set 1, Stitched Mini Scallop Square Stax); Sakura Clear Glaze pen; SU Dimensionals; adhesive
SIZE OF FINISHED PROJECT:  A2 (4 1/4" x 5 1/2")

Tuesday, August 4, 2015

DTGD15sweetmissdaisy - HOGS & KISSES

Hey there, *squeal*...See what I did there?  Ha!  I finally get to show you this cutie pie!  I made this for Anna's (aka sweetmissdaisy) Dare To Get Dirty challenge.  Think you know what the challenge is?  Head on over to Splitcoaststampers and sign up to be a Fan Club Member to see specific challenge details.  LOVE this card!

Two tags were cut from Neenah Solar White to make up the main panel.  One was colored with Copic markers for the sky, while the other was cut with My Favorite Things Rolling Hills die before being colored and layered onto the sky tag along with that awesome fence!  The pig was stamped on the grass (so I wouldn't have to cut the tail) then two more were stamped on Neenah, colored with Copic markers then fussy cut. One was placed directly over the stamped pig and the other was adhered to the back of the tag.  The sentiment was heat embossed on black card stock.


MFT's Gingham Background stamp was used to stamp a fishtail tag then layered.  Twine and ribbon completes the card.  It doesn't get much easier than this, but it's cute, cute, cute!


COPIC COLORING:
PIGS:  R02, R00, R0000  GRASS:  G46, G43, G40  SKY:  B00, BG0000

Thanks for stopping by!


SUPPLIES:
STAMPS:  MFT (Birdie Brown The Whole Herd, Gingham Background )
PAPER:  Neenah Solar White; Bazzill
INK:  Copic markers; Memento (Tuxedo Black, Lady Bug); VersaMark
ACCESSORIES:  Sizzix Big Shot; MFT Die-Namics (Blueprints & 16, Tag Builder Blueprints 2, Rolling Hills); scissors; Embossing Buddy; Ranger White Embossing Powder; heat tool; ribbon from my stash; Creative Impressions Black Twine; Glue Dot; Zig 2-Way Glue pen;  adhesive
TECHNIQUE(S):  Heat embossing; fussy cutting
SIZE OF FINISHED PROJECT:   A2 (4 1/4" x 5 1/2")

Tuesday, February 4, 2014

XOXO

Hey there, my LSS, Memories of Time, FINALLY started carrying Tiddly Inks clear stamps.  Whoop!  They are the cutest and so much fun to color!  To be fair, I say that about all of my stamps.  Ha!  Better hurry and get down to the store though...they are flying off the shelf!


This little cutie-patootie is Bloom Beautifully.  She was stamped with Tuxedo Black onto Neenah Solar White, colored with Copic Markers, fussy cut then popped up on foam.  The heart bouquet has a tiny bit of Spica pen for a touch of glitter.  The dotted paper that was paper pieced onto her dress, and also the dotted paper layer, were colored with Copic markers to soften the stark white.  I tried out about three different layouts before deciding on #226 sketch challenge from Just Us Girls...it was perfect!  I'm also going to enter this into the Naughty or Nice challenge #1, Love.  I went with nice...I've seen a couple of the naughty cards...oh, my!  *snicker*  I'll also be able to enter in this week's Tiddly Inks challenge #126, Love is in the Air.


COPIC COLORING: 
SKIN:  E11, E01, E00, E000, E0000, R30, BV20  HAIR:  E43, R42, E41  HAIR BOW, DRESS:  RV55, RV52, RV00  HEART BOUQUET:  R24, R22, R21, YG17, YG13, YG11  SHOES:  E43, E42, E41, RV55, RV52, RV00


Thanks for stopping by! 


SUPPLIES: 
STAMPS:  TI Bloom Beautifully
PAPER:  Neenah Solar White; Bazzill (Raven Monochromatic, Mud Puddle Swiss Dots); Doddlebug Design Inc. Sweetheart collection
INK:  Copic markers; Memento Tuxedo Black 
ACCESSORIES:  Sizzix Big Shot; MFT Die-namics (Layered Heart, Lots of Love); Hemptique 10 lb hemp twine; scissors; hobby blade; Slice MakingMemories Glass cutting plate; Atyou Spica Lipstick glitter pen; Scrapbook Adhesives by 3L Thin 3D Foam Squares; Zig 2-Way Glue pen; adhesive
TECHNIQUE(S):  Fussy cutting; paper piecing
SIZE OF FINISHED PROJECT:  A2 (4 1/4" x 5 1/2")

Friday, January 31, 2014

MWAHHHHHHH!

Hey there, this is the first time coloring one of the Senior-itas, from Stamping Bella, and I have to tell you, Wanda is my favorite!  Talk about character (she reminds me of one of my mom's good friends from when I was growing up)!  It's an awesome layout this week...I turned it into a window card!  Don't you love how she's peeking out to blow kisses?  Oh, and she just applied a fresh coat of lipstick (clear glaze pen) so pucker up, baby!  Ha!


Here's the inside...it's been a while, but I have a confession!  *grin*  OK, so I don't know what I was thinking...I colored the shirt with Cool Grays (see list below).  Only when I put it next to the papers I chose, I realized it was waaayyyyy off!  I had to wait until it was good and dry, then I went back over the entire shirt with Warm Grays.  Much better!  That's the beauty of Copics, if you don't like how something turned out, color over it!


COPIC COLORING: 
SKIN:  E11, E01, E00, E000, E0000, R30, BV20  HAIR:  W6, W4, W2, W0  LIPS:  R08, R05, R02  SHIRT:  C6, C4, C2, C0, W3, W1, W00, R08, R05, R02  INSIDE FRAME:  110

Next week's Bellariffic Fridays challenge is an Inspiration challenge.  Email your card to Em by Thursday, February 06, to be included on Bloggabella...you could win some Bella Bucks, but you have to use a current stamp!  Hmmm...what to do, what to do...my wheels are turning!  I'm looking forward to seeing what you come up with!


Thanks for stopping by! 


SUPPLIES: 
STAMPS:  SB Senior-ita Wanda
PAPER:  Neenah Solar White; Bazzill Raven Monochromatic; Echo Park Paper Head Over Heels collection
INK:  Copic markers; Memento Tuxedo Black 
ACCESSORIES:  Sizzix Big Shot; Spellbinders Nestabilities (Standard Circles Small, Standard Circles Large); KaiserCraft black rhinestones; Sakura Clear Glaze pen; adhesive
SIZE OF FINISHED PROJECT:  5 1/4" x 5 1/4"

Sunday, January 12, 2014

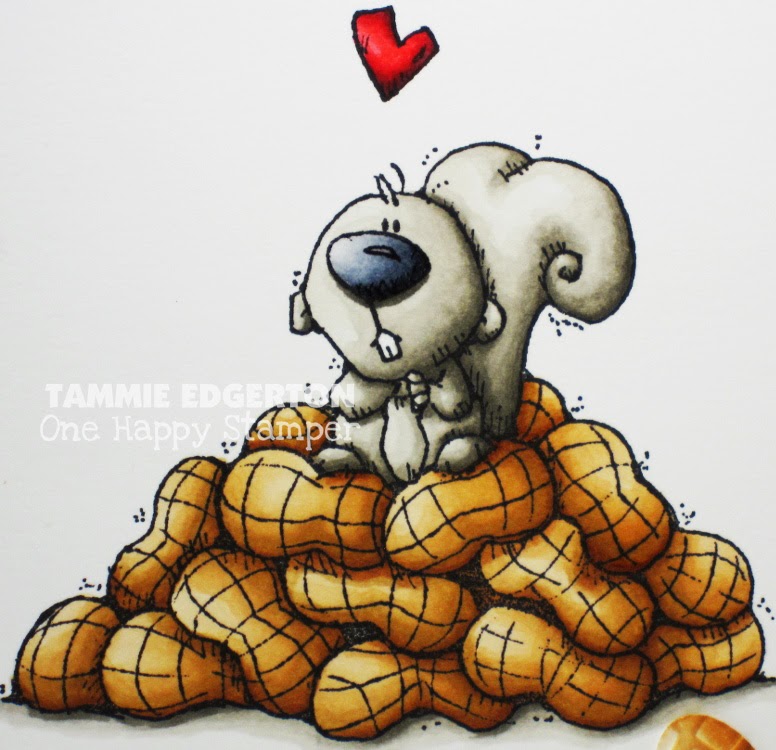
I'M NUTS ABOUT YOU

Hey there, with Christmas behind us, it's time to start thinking about those Valentines!  This super sweet squirrel is from Whipper Snapper Designs and makes a perfect Valentine!  I've got a group of ladies coming in from out of town to take a couple classes with me down at Memories of Time...this will be the first class.  It's going to be so much fun!


The image was stamped with Tuxedo Black onto Neenah Solar White then colored with Copic markers.  The squirrel's nose has Sakura Clear Glaze pen for a nice, subtle shine.  I haven't used my glaze pen for a while, so it was fun digging it back out again!  The sentiment was computer generated and also colored with Copics.  The heart is a My Favorite Things die that was sponged, embossed then colored with Copics to darken the shadows...looks a little like a peanut shell, huh?  *grin*  A MFT button with twine completes the card.


COPIC COLORING: 
SQUIRREL:  W6, W4, W2, W0  NOSE:  C6, C4, C2, C0  NUTS:  E33, E31, E30  HEART:  R56, R46, R43  GROUND:  W4, W2, W0  SENTIMENT:  R56, R46, R43

Thanks for stopping by! 


SUPPLIES: 
STAMPS:  WSD Nutty Squirrel
PAPER:  Neenah Solar White; Bazzill (Raven Monochromatic, Grenadine Fourz)
INK:  Copic markers; Memento (Tuxedo Black, Desert Sand)
ACCESSORIES:  Sizzix Big Shot; MFT Dienamics (LJD Rustic Hearts, Button Border); Sakura Clear Glaze pen; PC/printer (for the sentiment); Cuttlebug embossing folder; sponge; Creative Impressions Black Twine; Scrapbook Adhesives by 3L Thin 3D Foam Squares; adhesive
TECHNIQUE(S):  Embossing; sponging
SIZE OF FINISHED PROJECT:  A2 (4 1/4" x 5 1/2")

Sunday, June 30, 2013

MORE PERPETUAL CALENDAR PAGES

Hey there, happy Sunday!  Before I get started showing you more Taylored Expressions Perpetual Calendar pages, I would like to say goodbye to Google Reader.  *sniff*  Thanks to all of you that have been following my blog...if you are interested in continuing your subscription, you may want to consider trying Bloglovin'.  There is a new widget on the right hand side of my blog for you to follow me on Bloglovin' OR if you want to import your Google Reader to Bloglovin' so you can continue to follow all of your favorite blogs, follow this link.  It's really easy and only takes a few minutes, but you have to do it tonight!

Now on to the calendar pages...I've been having a blast making these pages!  The June page is a sponged sunset and the Beach Border silhouette die.  LOVE!  The sun was punched from Copic Mask It.  Several Memento inks (see supply list below) were sponged for the sky, the mask was removed and ink sponged onto the sun to soften it.  The border die cut completes the page...easy!


SUPPLIES: 
STAMPS:  None
PAPER:  Neenah Solar White; Bazzill Raven Monochromatic 
INK:  Memento (Dandelion, Cantaloupe, Peanut Brittle, Potter's Clay, Ladybug)
ACCESSORIES:  Spellbinders Grand Calibur; TE Taylored Dies (Beach Border); TE Perpetual Occassions Calendar; 1 1/4" circle punch; Copic Mask It; sponges; paper snips; Zig 2-Way Glue pen; adhesive
TECHNIQUE(S):  Masking; sponging
SIZE OF FINISHED PROJECT:  4" x 4" (top panel)

I had a snow flurry in mind when making the January page (probably because it's been stinkin' hot here on the Oregon Coast!).  I started off using a toothbrush to spritz colorless masking fluid onto the panel.  Once it was dried, Memento London Fog was sponged over the entire panel then the masking fluid was rubbed off.  Make a Snowflake dies were cut from glitter card stock then adhered directly to the panel.


SUPPLIES: 
STAMPS:  None
PAPER:  Neenah Solar White; Bazzill Raven Monochromatic; White Glitter card stock 
INK:  Memento London Fog 
ACCESSORIES:  Spellbinders Grand Calibur; TE Taylored Dies (Make a Snowflake); TE Perpetual Occassions Calendar; Winsor & Newton Colourless Art Masking Fluid, toothbrush, sponge; Ebony Sparklet; KaiserCraft Silver rhinestone; Zig 2-Way Glue pen; adhesive
TECHNIQUE(S):  Masking; sponging
SIZE OF FINISHED PROJECT:  4" x 4" (top panel)

The last one for today is February.  For such a tiny little panel, it sure has a lot going on!  The Cloud Border die was used to create the sponged background.  Love Tree was cut, colored with Copic markers then adhered directly to the sponged panel.  The Picket Fence Border was adhered over the tree and a heart from Cupid's Arrows was popped up on foam.


COPIC COLORING: 
TREE TRUNK:  E27, E25, E23, E21  HEARTS:  R39, R35, R32

SUPPLIES: 
STAMPS:  None
PAPER:  Neenah Solar White; Bazzill Raven Monochromatic 
INK:  Copic markers; Memento Angel Pink 
ACCESSORIES:  Spellbinders Grand Calibur; TE Taylored Dies (Love Tree, Cupid's Arrows, Cloud Border, Picket Fence Border); TE Perpetual Occassions Calendarsponge; Zig 2-Way Glue pen; SU Dimensional; adhesive
TECHNIQUE(S):  Sponging
SIZE OF FINISHED PROJECT:  4" x 4" (top panel)

Thanks for stopping by! 


Monday, January 21, 2013

BE MINE

Hey there, how about another Valentine's Day card?  This was created with Taylored Expressions Graphic Greetings Valentine.  Gotta love quick and easy stamping, right?  This was just that!  The panel was sponged with Memento Love Letter and Rhubarb Stalk then the sentiment was stamped with Tuxedo Black.  The seam binding was died to match the sponging, and the paper is from the TE Love Letters Project Pantry kit.


Here's the inside... 


Thanks for stopping by! 


SUPPLIES: 
STAMPS:  TE Graphic Greetings Valentine
PAPER:  Neenah Solar White; Bazzill Raven Monochromatic; TE Love Letters Project Pantry kit
INK:  Memento (Tuxedo Black, Love Letter, Rhubarb Stalk)
ACCESSORIES:  Glue Dots (micro and mini); SU Dimensionals; seam binding; Mini Mister (water); heat tool; Bazzill Blackbird rhinestones; stick pen and beads from my stash; adhesive
TECHNIQUE(S):  Sponging
SIZE OF FINISHED PROJECT:  A2 (4 1/4" x 5 1/2")

Wednesday, January 9, 2013

TAYLORED EXPRESSIONS JANUARY SPOTLIGHTS: CUPID'S ARROWS

Hey there, well, it's THAT day...yep, last day of Taylored Expressions Spotlights.  Today I'm spotlighting Cupid's Arrows dies.  This card turned out waaayyyy different in my head!  LOL!  I ran the Hearts Cutting Plate through four times with different card stocks to create the background and hearts/arrows from Cupid's Arrows takes center stage.  A sentiment from Valentine Doodles makes this one easy peasy card!  I hope you've enjoyed checking out TE's awesome new release!


Here's the inside... 


SUPPLIES:
STAMPS:  TE Valentine Doodles
PAPER:  Neenah Solar White; Bazzill Raven Monochromatic; TE Valentine Project Pantry Kit (card stock)
INK:  Memento Tuxedo Black
ACCESSORIES:  Spellbinders Grand Calibur; TE Taylored Dies (Cupid's Arrows, Hearts Cutting Plate); TE Valentine Project Pantry Kit (ribbon); Zig 2-way Glue pen; SU Dimensionals; adhesive

SIZE OF FINISHED PROJECT:  A2 (4 1/4" x 5 1/2")

Carole Burrage
Charmaine Ikach
Jen Shults
Kerri Michaud
Lynnette Kauffman
Sankari Wegman
Shannon White
Shelly Mercado
Stephanie Kraft
Tammie Edgerton (that's me!)
Taylor VanBruggen
Wanda Guess
Anna Wight (Guest Designer)

Thanks for stopping by! 

TAYLORED EXPRESSIONS JANUARY SPOTLIGHTS: VALENTINE DOODLES & STUCK ON YOU

WEDNESDAY, JAN 9

Hey there, it's the first of two spotlight days for Taylored Expressions January Release.  Did you know that all of the stamps and dies you've been seeing the Baker's Dozen use over the last few days are available in the Fresh out of the Oven section of their store?  Yep, head on over and check it out!  Oh, but wait...don't you want to see my projects first?  *wink*

Today I'm spotlighting not one, but TWO projects!  The first is a super fun stamp set called Valentine Doodles.  It makes perfect, quick and easy Valentine's...especially when they're teamed up with the new 3" x 3" Tuck & Close Notecard die.  Have you seen them made up as sucker holders?  ACK...why didn't I think of that!?!  So clever!  Anyway...I made a set of three note cards with a matching box  (perfect to give as a gift).  The box is just big enough to hold all three cards and envelopes, which are available for purchase in the TE store.  I used more pattern papers and card stock from the Valentine Project Pantry Kit.  I love that everything matches perfectly!


Here's the inside...each of the three are exactly the same.  Simple with plenty of room to write!


COPIC COLORING: 
BIRD:  R35, R32, R30, C6, C4, C2, C0  ENVELOPE:  BG34, BG23, BG10, R27, R24, R22, R21


COPIC COLORING: 
HEART:  R27, R24, R22, R21  ARROW:  BG34, BG23, BG10  SHADOW:  C3, C1, C00


COPIC COLORING: 
PUPPY:  C6, C4, C2, C0  EARS / EYE PATCH:  C3, C1, C00  NOSE:  R30  SHADOW:  C3, C1, C00


COPIC COLORING: 
ICECREAM:  R35, R32, R30, R27, R24, R22, R21  CONE:  BG34, BG23, BG10  SHADOW:  C3, C1, C00


SUPPLIES: 
STAMPS:  TE Valentine Doodles
PAPER:  Neenah Solar White; Bazzill Raven Monochromatic; TE Valentine Project Pantry Kit
INK:  Copic markers; Memento Tuxedo Black
ACCESSORIES:  Spellbinders Grand Calibur; TE Taylored Dies (Tuck & Close Notecard, Label Stacklets 2); Stamp-a-ma-jig; Sakura Clear Glaze pen; Bazzill (Blackbird rhinestones, black brads); Creative Impressions Black Twine; paper snips; Scor-Pal; hole punch; adhesive
SIZE OF FINISHED PROJECT:  Box...including handle (3 5/8" wide x 1 5/8" deep x 4 1/2" tall); Cards (3" x 3"); Envelopes (3 1/4" x 3 1/4")

The next project is a card that spotlights the set called Stuck on You...it has the cutest little hedgehogs EVER!  I shared yesterday that I had narrowed down my list of favorite stamp sets to two...yeppers, this is the other fav!  He was so fun to color and dang it if I don't want to just pinch that rosey little cheek!  LOL!  Check it out, more pattern paper and ribbon from the Valentine Project Pantry Kit!  The heart Nestie was sponged with Lady Bug and Rhubarb Stalk Memento ink while it was still in the die.  Both the hedgehog and sentiment were stamped on the sponged heart then it was ran through a Xyron and sprinkled with Glamour Dust.  It spah-kles!  The hedgehog was stamped a second time, colored with Copic markers, fussy cut then popped up on foam.  The heart balloon is covered with Glossy Accents.


Here's the inside...the heart bouquet is the perfect touch!


COPIC COLORING: 
HEDGEHOG:  E47, E44, E43, E42, R02, E02, E00  BALLOON:  R27, R24, R22, R21  INSIDE IMAGE:  R27, R24, R22, R21


SUPPLIES: 
STAMPS:  TE Stuck on You
PAPER:  Neenah Solar White; Bazzill Raven Monochromatic; TE Valentine Project Pantry Kit
INK:  Copic markers; Memento (Tuxedo Black, Lady Bug, Rhubarb Stalk)
ACCESSORIES:  Spellbinders (Grand Calibur; Nestabilities Classic Hearts, Classic Scalloped Hearts); TE Taylored Dies (Lace Chain Border); sponges; paper snips; Xyron; DecoArt Glamour Dust; Sakura Clear Glaze pen; Glossy Accents; TE Valentine Project Pantry Kit (ribbon); Bazzill Blackbird rhinestones; SU Dimensionals; adhesive
TECHNIQUE(S):  Fussy cutting
SIZE OF FINISHED PROJECT:  A2 (4 1/4" x 5 1/2")

Well that does it for me...I hope you enjoyed checking out both of my projects today and I'll be back again tomorrow with the last spotlight.  Head over to each of the Baker's Dozen blogs for more eye candy!

Carole Burrage
Charmaine Ikach
Jen Shults
Kerri Michaud
Lynnette Kauffman
Sankari Wegman
Shannon White
Shelly Mercado
Stephanie Kraft
Tammie Edgerton (that's me)
Taylor VanBruggen
Wanda Guess

Thanks for stopping by! 


Related Posts Plugin for WordPress, Blogger...