Follow Along...

Wednesday, September 5, 2018

TAYLORED EXPRESSIONS 10TH BIRTHDAY CELEBRATION!


Hey there, life is still crazy busy while we're in the middle of remodeling our new home.  We are slowly making progress, but my hubby and I sure wish it were over with already!  I keep reminding myself, and him, that it will totally be worth it in the end.  I'm happy to report, my friend helped me come up with a layout for my new, crafty space; now I patiently wait for a sale at IKEA.  I'll post some pictures later as it starts to come together.

Enough about all that though...back to the real reason you are here.  Some of you might remember that I was a designer for Taylored Expressions several years back, before taking a break from paper crafting for the last few years.  Anyway, I was really excited to be invited to help celebrate TE's 10th Birthday!  Can you believe TE is 10 already?  Where has the time gone?  Almost 40 of TE's designers, both past and present, are joining together to wish TE another successful 10 years!  To kick off this birthday bash, head on over to the TE blog for the complete list of participating designers and to hop along with us!

For my projects today, I'm highlighting some fun, previously released birthday goodies.  Could that lion be any cuter?  I mean seriously!!!  He was stamped with Tuxedo Black onto Neenah Solar White then colored with Copic markers.  I couldn't resist trying my hand at a Shadow Box card (Jennifer McGuire shared a how-to video a while back).  The circle for the card front was the cut out for the inside window.  Squeezed Lemonade and Fossilized Amber Distress Oxide inks were sponged to create the sun rays using TE Here Comes the Sun stencil.  A retired TE stamp set was used for the sentiment then the lion was popped up on foam.


Here's the inside.  The cloudy sky was sponged with Salty Ocean Distress Oxide ink and TE Set the Scene Clouds stencil before the card base was assembled.  The flower/flower pot, Bloom Where You're Planted, was die cut from white card stock then colored with the same Copic markers as the card front.  Both sizes of the Little Bits clouds were adhered to the inside and outside of the window frame for a little extra interest.  The Wish Big sentiment, from Mane Event stamp/die combo, was stamped onto the colored flower pot to complete the card.
Here's the side view showing the dimension.  What a fun layout!  I'll definitely be doing more cards like this...you know, when I start paper crafting again!


COPIC COLORING: 
LION:  Y28, Y26, Y02  LION'S NOSE, EARS:  Y02, R20  BIRTHDAY HAT:  R27, R24, R22, R20, G28, G24, G21, G20  FLOWERS:  R27, R24, R22, R20, G24, G21, G20, Y02  INSIDE:  Y28, Y26, Y02, R27, R24, R22, R20, G28, G24, G21, G20

SUPPLIES: 
STAMPS: TE Mane Event (stamp & die combo), From Me to You (retired)
PAPER: 110 lb Neenah Solar White (card base), 80 lb Neenah Solar White (lion), 80 lb Neenah Eclipse Black
INK: Copic markers; Memento Tuxedo Black; TH Distress Oxide (Squeezed Lemonade, Fossilized Amber, Salty Ocean)
ACCESSORIES: Big Shot; Scor-Pal; TH Stamp Platform; TE Dies (Mane Event (stamp & die combo), Bloom Where You're Planted, Little Bits Sun & Clouds); Nestabilities Circle dies; TE Stencils (Here Comes the Sun, Set the Scene Clounds); Scor-Tape; Scrapbook Adhesives 3D Foam Squares; scissors; Mono Sand Eraser; Art Glitter glue; ATG gun
TECHNIQUE(S): Shadow Box card
SIZE OF FINISHED PROJECT: A2 (4 1/4" x 5 1/2")

I had so much fun coloring the lion, and my stuff was already out...sooo, I couldn't resist making another birthday card.  It was actually perfect timing because a lady that is very important to my husband is turning 80, so this card is for her.  He said he wanted a yellow rose (my favorite), so I was able to use the same colors as the first card.  I think my jaw hit the floor when I was going through the TE store and came across the Big Blooms flowers.  I mean, just WOW!  Of course, I had to get all of them, right!?!  LOL  Well, all but the hollyhocks...they were on back order at the time.  I did notice they were back in stock, so I might just have to get that one too!  Anyway, the rose was stamped with Tuxedo Black onto Neenah Solar white, masked so the leaves could be stamped with the appearance of being below the flower then colored with Copic markers.  The Sending Script die was cut from white card stock three times and once in black for the top layer.  The Birthday Wishes sentiment, from the coordinating Sending Sunshine stamp set, was stamped on white card stock, cut into a skinny banner then popped up on foam.  A few black rhinestones complete this easy-peasy card!


COPIC COLORING: 
ROSE:  Y28, Y26, Y02  LEAVES:  G28, G24, G21, G20

SUPPLIES: 
PAPER: 110 lb Neenah Solar White (card base), 80 lb Neenah Solar White (lion), 80 lb Neenah Eclipse Black
INK: Copic markers; Memento Tuxedo Black 
ACCESSORIES: Big Shot; Scor-Pal; TH Stamp platform; MISTI Creative Corners; TE Sending Script die; KaiserCraft Black Rhinestones; Post-it Removable Labeling Tape; Scrapbook Adhesives 3D Foam Squares; scissors; Mono Sand Eraser; Art Glitter glue; ATG gun
TECHNIQUE(S): Masking
SIZE OF FINISHED PROJECT: A2 (4 1/4" x 5 1/2")

At the heart of Taylored Expressions is a mission to share joy through the gift of handmade cards.  As part of their 10th birthday, TE is continuing that mission with the launch of a special Share Joy campaign focused on providing birthday cards to those in nursing homes, and assisted-living facilities, across the U.S.  To make as deep an impact as possible, TE is inviting card makers everywhere to join the campaign.  Will you join us?  Find out how to participate by viewing their Share Joy page. 

Thanks for stopping by, and enjoy the rest of the hop! 

Sunday, January 21, 2018

BIRTHDAY FLYBY

Hey there, so, did you notice I disappeared for a while?  I think I shared in my last post (over a year ago) that we bought a new house.  Hubby and I remodeled it until it was ready to move in, moved, remodeled the old house and now we are working on the new house again.  Sooo needless to say, it's been a super busy year with absolutely no time to color.  To be honest, I wasn't even sure if I could remember how to get into my blog let alone create a post.  Sheesh...getting old!  LOL

Anyway, here's a shout out to one of my blog followers, Julie S.  She emailed me last month asking if everything was going well in my life and to say she misses seeing my creations.  It was very touching and, Julie, I appreciate your emails more than you know.  Julie gave me the much needed kick in the hiney to get back to my favorite hobby...paper crafting!  So here I am, dipping my toes back into the kiddie pool, with Kathy Racoosin's 30-day coloring challenge.  I haven't participated every day, but at least I'm coloring again!  *grin*  If you follow me on Instagram or Facebook, I've been posting updates as I go.

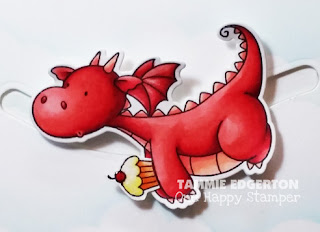
Now, onto the card...my aunt's birthday is next weekend, so I decided to make her a special card.  The adorable dragons were stamped with Tuxedo Black onto Neenah Solar White then colored with Copic markers.  I used the current MFT Color Challenge as inspiration...I'm so rusty, it seemed like a great starting point!  For the slider element, I actually cut three dragons and glued/stacked them for extra stability.  In hindsight, I think I should have stopped at two.  He's kind of heavy and doesn't slide as easily as he should.  Oh well, pretty sure my aunt will love him anyway!  I also used the cupcake from Happy Hippo to put in the dragon's arms.  I used MFT stencils and Clarity brushes for the sun and clouds.  Although I like the brushes, I think I prefer sponging...but that's just me.  *confession time*  After the card front was assembled, I noticed a fingerprint above the sentiment.  *sigh*  There was no way I was going to start over, so, out came the Flat Bottom Cloud dies!  I inked up the bottoms of them then popped them up on foam.  Problem solved!  Clear glaze pen was used on the cherry, and a clear sparkle pen was used on the dragon's wings, the frosting part of the cupcake and also on the tops of the clouds.  You can't see it in the pictures, but it was the perfect touch!


Here's the inside...I decided to color another of the dragons and masked his little face before stamping the balloons from Beary Special Birthday.  I added sparkle pen to his wings, balloons and the sentiment die cut before putting clear glaze pen on the balloons.


COPIC COLORING: 
DRAGON'S BODY, EARS, WINGS:  R37, R35, R32  DRAGON'S TUMMY, NAILS, HORNS, SPINES:  R32, R30  CUPCAKE:  YR16, YR12, YR00, Y02, Y0000  CHERRY:  R37, R35  BALLOONS:  YR16, YR12, Y02, Y0000, B12, B00  GROUND:  C3, C1  CELEBRATE DIE CUT:  YR16, YR12

THIS PROJECT INCLUDES THE FOLLOWING CHALLENGES: 
MFT THE BIRTHDAY PROJECT ~ Celebrate Good Times (it just said to incorporate the word "celebrate" into our card design; mine is on the inside panel...hope that's OK)
MFT COLOR CHALLENGE ~ #85
THE DAILY MARKER ~ 30-day Color Challenge

Well, I guess that's it...I hope I didn't forget anything.  Thanks for stopping by!


SUPPLIES:
STAMPS:  MFT Birdie Brown (Magical Dragons, Beary Special Birthday, Happy Hippos)
PAPER:   Neenah Solar White 
INK:  Copic markers; Memento Tuxedo Black; Ranger Distress Ink (Tumbled Glass, Mustard Seed) 
ACCESSORIES:  Sizzix Big Shot, Spellbinders Prizm, MFT Die-namics (Magical Dragons, Hit the Slopes, Flat Bottom Cloud, Stitched Rectangle STAXS); PB Celebrations Creative Dies; TE Cloud Border; MFT Mix-ables Stencil (Radiating Rays, Mini Cloud Edges); Clarity Brushes; MISTI; MFT Spin & Slide Discs; scissors; Sakura Clear Glaze pen; Spectrum Noir Crystal Clear Sparkle pen; Zig 2-way Glue Pen; Inkssentials Glossy Accents; Scotch Permanent Mounting Tape; ATG tape
TECHNIQUE(S):  Slider card; masking
SIZE OF FINISHED PROJECT:  A2 (4 1/4" x 5 1/2")
Related Posts Plugin for WordPress, Blogger...