Pages

Tuesday, June 14, 2011

FIREWORKS

Hi there stampers!  I had such a great time on my last 4th of July card I thought I would try another.  The other day when I was at the craft store, I noticed a lack of 4th of July products...so I figured I would have to improvise.  No problem!  As I was getting ready to call it good, I spotted a metal stencil that had a swirly pattern...looks like fireworks to me.  Whoop whoop!

Black cardstock was taped to the stencil and ran through a Big Shot.  With the paper still taped to the stencil, white craft ink was sponged on the "fireworks".  After it dried, red and blue ink was applied over the white.  Let Freedom Ring stamp set from Our Craft Lounge was used to stamp on Neenah.  I wanted the flag to appear to be part of the box of fireworks but I wanted it to be behind the main image, so it was masked then stamped.  I also wanted to go out of the box with a Nestie.  You can learn how to do the technique with this tutorial on Split Coast Stampers.  It's sooo cool!  I stamped a second box of fireworks, cut out and colored half of the flag, one rocket and the wooden crate then popped them up on the main image (you might be able to see them better on the close-up pic...or click on either pic for a better view).

To complete the card, a blue circle mat and star Nesties were cut and layered on the card.  The star was adhered directly to the card base and the blue circle mat and the main image were popped up.  The small stars were cut out of glitter paper using a border punch.  Guess that's about it.

Copic coloring:

Flag:  R29, R27, R24, E29, E27, E25, E23, E21  Fireworks:  R29, R27, R24, B29, B28, B26  Box:  E29, E27, E25, E23, E21  Grass:  YG95, YG93, YG91, YG17  Sky:  B00, B000, B0000

Thanks for stopping by!


SUPPLIES
STAMPS:  OCL's Let Freedom Ring
PAPER:  Neenah Solar White; SU Real Red, Brilliant Blue, Basic Black; Best Creation Inc Glitter Cardstock Red and Blue
INK:  Memento Tuxedo Black; SU Real Red, Brilliant Blue, Craft White
ACCESSORIES:  Copic markers; Big Shot; Dreamweaver Stencil; removable tape; sponges; sticky note mask; Stamp-a-ma-jig; paper snips; Exacto knife; cutting mat; Spellbinders Grand Calibur, Nestabilities Standard Circles Small and Large, Stars Five; EK Success border punch; adhesive; Quickie Glue Pen; Foam Squares
SIZE OF FINISHED PROJECT:  A2 (4 1/4" x 5 1/2")

Tuesday, June 7, 2011

HAPPY 4TH!

Hey there bloggers!  I was feeling a little patriotic today so I made my first 4th of July card.  It is a simple card with a simple layout, but I think it works!

I used the Let Freedom Ring stamp set from Our Craft Lounge.  I've wanted to play with this set for a while but just now got around to inking it up.  All images were stamped on Neenah and colored with Copic markers.  Two different embossing folders were used.  Stars on the blue and the white is a tad bit different...you might recognize it as the wood grain folder by Tim Holtz.  I wanted to use some sort of striped pattern and well, that was the closest thing I had without running down to the craft store.  Would you have figured it out right away if I hadn't have told you?

The flag bunting was taped down at the top and popped up on the bottom with Foam Squares.  Stickles were added to the white on the hat and bunting to give it a little pizazz and the hat and the star are both popped up.  The sentiment was stamped on a jewelry tag punch and the ribbon is from my stash.  Guess that's about it.

Copic coloring:

Banner:  B29, B28, B26, R29, R27, R24  Hat:  B29, B28, B26, R29, R27, R24  Outlines:  110

This project includes the following challenges:

Crafts and Me Challenges ~ Punch it Out
Delicious Doodles Challenges ~ Texture
Moving Along With the Times ~ No Designer Paper
My Sheri Crafts ~ Flag Day
One Stop Craft Challenge ~ Texture
Sassy Studio Designs ~ No Patterned Paper
Take a Word ~ Stars

Thanks for stopping by!SmileyCentral.com 


SUPPLIES
STAMPS:  OCL's Let Freedom Ring
PAPER:  Neenah Solar White; SU Real Red, Brilliant Blue
INK:  Memento Tuxedo Black
ACCESSORIES:  Copic markers; Big Shot; Sizzix Tim Holtz Alterations wood grain embossing folder, Stars with Swirls embossing folder; Spellbinders Grand Calibur, Nestabilities Stars Five; paper snips; adhesive; Foam Squares; Star Dust Stickles; SU EK Success Jewelry Tag Punch; twine from The Twinery; Mini Glue Dots; ribbon from my stash
SIZE OF FINISHED PROJECT:  A2 (4 1/4" x 5 1/2")

Saturday, June 4, 2011

ALOHA, CAMS!

Hi there stampers!  I found my Mojo...whoop whoop!  You know how you always tuck something away in a "safe place" so you won't lose it and then you forget where you put it?  Yep, that's me...tucked my Mojo away and couldn't remember where it was!  I was beginning to think I would have to make some signs to hang on bulletin boards around town..."Lost Mojo, if found, please return to Tammie".  No worries though, it was safe and sound all along!  I'm happy to be back and crafting again, that's for sure!  Did you catch that, Gale?  I'm ba-a-ack!  LOL!

My friend, Cami, is counting down the days...she's going to Hawaii, baby!  OK, I'm only a little jealous but mostly excited for her!  I decided to make her a card and break out yet another turtle stamp.  Hopefully you didn't get overloaded on turtles yesterday.  Ha!  You have to admit...they were pretty cute though, huh?

Today I'm using Kona from OCL's Hangin' Loose with Kona stamp set.  He's another cutie-patutie turtle!  He was stamped on Neenah with Memento Tuxedo Black ink and colored with Copic markers.  A Sakura clear glaze pen was used on Kona's eyes and sunglasses and Glossy Accents on the water drops.  The DP is from My Mind's Eye.  Love it!

Aloha, my friend, I hope you have the time of your life!
 
Copic coloring:

Kona:  YG67, YG63, YG61, YG11, R21, R20  Kona's belly:  YG11, YG00, YG0000  Towel:  R22, R21, R20  Shorts:  BG13, BG11, BG10, R27, R24, R22  Flipflops:  R22, R21, R20  Water drops:  BG10  Sand:  E35, E34, E33, E31, E30, E42  Sky:  B00, B000, B0000  Sentiment:  R22, R21, R20, B00, B000, B0000

This project includes the following challenges:

Crafts and Me Challenges ~ Punch it Out
Crafty Hos' Challenge Blog ~ Twine
Creative Inspirations ~ Cute Bears / Animals Only
Dream Valley Callenges ~ Stamp Something
Fab 'n' Funky Challenges ~ What'eva
Meljen's Designs ~ Coastal Fun
Paper Crafting Journey ~ Anything Goes / Your Favorite
Paper Cutz Challenge ~ Beach or Travel Theme
Penny's Paper-Crafty Challenge Blog ~ Here Comes Summer
Stamp Insanity ~ Anything Goes

Thanks for stopping by!


SUPPLIES
STAMPS:  OCL's Hangin' Loose with Kona
PAPER:  Neenah Solar White; My Mind's Eye 29th Street Market DP
INK:  Memento Tuxedo Black
ACCESSORIES:  Copic markers; Spellbinders Grand Calibur, Nestabilities Standard Circles Large, Big Scalloped Circles Large, Ribbon Tags Trio; Glossy Accents; clear Glaze Sakura pen; Foam Squares; Honeydew twine from The Twinery; EK Success border punch; adhesive
SIZE OF FINISHED PROJECT:  A2 (4 1/4" x 5 1/2")

Friday, June 3, 2011

BLOG HOP

Hello there stampers!  Today is day two of the Sneak Peek/Blog Hop over at Our Craft Lounge.  If you've hopped along from the beginning, you would have started at The Lounge (OCL blog) then found your way to me via Stephanie's blog.  So are you excited with what you've seen for this mini-release?  Total cuteness, right!?!


The set I'm showing today is called Slow & Steady.  Seriously...it's my most favoritest in the release.  Talk about versatility!  There are five...count them five...sentiments that can fit on the turtle's shell.  The dotted pattern is separate and can be stamped towards the top or bottom of the shell...or not at all!  And let's not forget about all those accessories!  They really add a lot of character to your scene!  And how about those adorable bugs?  Don't you just want to pinch their little cheeks?

The turtle and bugs were masked and stamped onto Neenah Solar White card stock then colored with Copic markers.  I went "out of the box" with the dragonfly's wing and sparkled them with Stickles.  The ladybug has a thick coat of Glossy Accents as do the turtle's toenails.  A Sakura Glaze pen was used on all of their eyes.

Copic coloring:


Turtle: R20, YG95, YG93, YG91, E47, E44, E43 Ladybug: R20, R29, R27, R24, C5, C3, C1 Dragonfly: R20, V25, V20, BG000, BG0000 Grass: YG95, YG93, YG91 Sky: B00, B000, B0000

This little get well turtle was done more or less the same as the first...stamped on Neenah and colored with Copics then cut out.  The tissue box was "paper pieced" to match the background.  I cut a slit in the top of the box and put in a piece of Charmin...I know, I probably should have used a Kleenex, but hey, it's what was handy.  *snort*

The turtle's toenails have Glossy Accents on them and it's eyes have clear Sakura Glaze.  Spellbinder's Nestabilities were used to cut out the shapes and the circle was sponged before it was removed from the die.  Both the circle and the turtle were popped up with Foam Squares.


Copic coloring:

Turtle: R20, YG95, YG93, YG91, E47, E44, E43


And now for my last card...I totally CASED our very own Deb Felts!  I fell in love with her layout so I bummed it.  Thanks, Deb!  SmileyCentral.com

Everything was masked and stamped on Neenah card stock and colored with Copic markers.  I used the "out of the box" technique again.  The dragonfly was stamped three times and the wings colored, Stickled then layered.  The ladybug, balloons and toenails all have Glossy Accents and their eyes all have clear Glaze Sakura pen.  The rhinestones are from Bazzill and the twine is from The Twinery (love that stuff!).  The Treat Yourself sentiment comes from OCL's Life is Sweet set.  I figured since it was still on my desk from yesterday's Sneak Peek, I would get one more use out of it.

I tried to get a good close-up of the dragonfly's layered wings (click on the pic for a better view).  Check out the Glossy Accents on the ladybug and the transparent balloons.  Pretty cool, huh?


Copic coloring:

Turtle: R20, YG95, YG93, YG91, E47, E44, E43 Ladybug: R20, R29, R27, R24, C5, C3, C1 Dragonfly: R20, V25, V20, BG000, BG0000  Present:  V25, V20, R85, R83, R81, YG06, YG03  Balloons:  R85, R83, R81, YG09, YG06, YG03, B05, B02, B00  Grass: YG95, YG93, YG91 Sky: B00, B000, B0000


Well, I guess that's it.  Are you ready to see what the complete set looks like?  Here it is...

Don't forget, after you're done leaving me some luv, head back over to The Lounge and make sure you leave a comment there for more chances to win one of these cool new stamp sets from the mini-release.  Make sure you let them know which is your fav set (uh...I think you know which one is mine  Laugh) and what you like about it.  You have until Sunday to leave comments on all of the participating Design Team's blogs and also the OCL blog.  Winners will be posted on Monday, June 6th.


Thanks for stopping by and have a great weekend!


SUPPLIES
STAMPS:  OCL's Slow & Steady, Life is Sweet
PAPER:  Neenah Solar White; SU Basic Black; S E I Doodley-doo Girl DP (double sided)
INK:  Memento Tuexedo Black; SU Creamy Caramel, Close to Cocoa, Chocolate Chip, Marina Mist
ACCESSORIES:  Copic markers; Big Shot; Spellbinder's Grand Calibur, Nestabilities; Cuttlebug embossing folder; sponges; Star Dust Stickles; Glossy Accents; clear Glaze Sakura pen; paper snips; Foam Squares; Bazzill Blackbird rhinestones; Micro Glue Dot; Charcoal twine from The Twinery; square punch; corner rounder punch
SIZE OF FINISHED PROJECT:  A2 (4 1/4" x 5 1/2")

Thursday, June 2, 2011

SNEAK PEEK

Hey there stampers!  It's time for another Sneak Peek/Blog Hop over at Our Craft Lounge...whoop whoop!  If you have followed from the beginning, you should have arrived here from Stephanie's blog...and your last stop for the day, back to the The Lounge (OCL blog).  Winners of the Sneak Peek/Blog Hop will be chosen from all the comments left on the participating Design Team's blogs and also The Lounge blog so make sure you leave comments for everyone! 

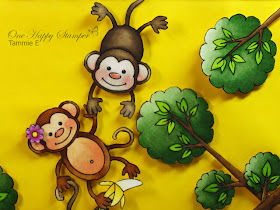
The set I'm sharing today is called Monkey Around.  As soon as I saw the monkeys, I thought of another OCL set called Life is Sweet.  After all...what monkey can resist a "banana" split, right!?!  Not these little guys!

Several monkeys, trees, word bubbles (you might recognize as another OCL Sneak Peek set called Shout it Out) and the banana split were stamped on Neenah paper, colored with Copic markers and cut out.  Glossy Accents were applied to the monkey's noses, cherry and the glass dish then they were popped up on the gift bag and matching card with Foam Squares.  Easy peasy!


Copic coloring:

Boy monkey:  E47, E44, E43, E40, R20  Girl monkey:  E39, E37, E35, E30, R20, RV66, RV63, Y13  Tree:  YG67, YG63, YG61, YG25, YG23, E59, E57, E55  Banana:  Y15, Y13, Y11, Y000, Y0000  Word bubble:  B00, B000, B0000, BV31 Banana split:  Y00, Y000, Y0000, YR30, R21, R20, E59, E57, E37, E35, BV31, C0  Dish:  BV31, BG000, C0  Cherry:  R29, R27, R24  Outlines:  110

I hope you had a great time checking out the Sneak Peeks for the new mini-release!  Thanks for stopping by today and I hope to see you back here tomorrow for the Blog Hop!

SUPPLIES
STAMPS:  OCL Monkey Around, Shout it Out, Life is Sweet
PAPER:  Neenah Solar White; SU Basic Black, YoYo Yellow
INK:  Memento Tuxedo Black; SU Real Red
ACCESSORIES:  Paper snips; Glossy Accents; Foam Squares; adhesive
SIZE OF FINISHED PROJECT:  Gift bag:  8" wide x 10 1/2" high; Card:  A2 (4 1/4" x 5 1/2")